Check out dv.com for my reviews of:
Panasonic AG-HVX200 (May 2006)
Canon XL H1 (April 2006)
JVC GY-HD100 (April 2006)
Canon XL2 (March 2005)
Panasonic AG-LA2700A anamorphic lens (August 2004)
Panasonic AG-DVX100A (June 2004)
Panasonic AG-DVX100 (December 2002)
Go to dv.com > reviews > cameras and click on "Archive" to get the full listing.
If you can't find the aricles online, please ask dv.com to repost them!

Contents
- Introduction
- The DVX100A (and B)
- What's the DVX100P? What happened to the DVX100, no P?
- How is 24p recorded? What's the difference between 24p and 24p Advanced?
- When to shoot 24p? 24p Advanced? 30p?
- Handling the Zoom
- Focusing by the numbers
- Why no colorbars / gain-up / autofocus in progressive mode?
- 16x9?
- Cine-style Accessories
- Gamma settings
- Matrix settings
- Strange noises & Construction
- Why do the DVX100 stills at 24p.com look so different?
- The chroma-patterning problem
- Audio / video sync
- Autoexposure
- Cleaning the lens
- Links for more info
Introduction
The Panasonic AG-DVX100A is a DV camcorder offering 60i, 30p, and 24p image capture (a 625/50 version, the DVX100E, offers 50i and 25p).It's under US$4000. Aside from the $5000 Canon XL2, the next lowest cost 24p video camera is about US$19,500: the Panasonic AJ-SPX800.
With its introduction the DXV100, and its successor the DVX100A, instantly became the hot cameras for indie digital filmmakers. The 24p-capable Canon XL2 only adds to the excitement. As a result there's a lot of hype, hysteria, and FUD (fear, uncertainty, doubt) about them and about 24p production in general.
I'll try to navigate through the hype, hysteria, and FUD to provide factual material and rational analysis. I have the original DVX100 and I can put it through its paces alongside a Sony DSR-PD150 (the de facto standard in $4000 DV cameras) as well as the DSR-500, a higher-end favorite among digital filmmakers. I'll also try to use various post-production tools and see what works, and how.
Note: I focus here on the Panasonic DVX100-series cameras, but much of what I talk about applies to the Canon XL2 and to the bigger 24p Panasonics as well.
Cutting to the chase: the DVX100 is a very good camera for its price, even ignoring its 24p capability. Perfect? Heck, no. It has all sorts of flaws and omissions, just like any other $4000 camera. But for what you pay, you get a lot; if you understand both the strengths and the weaknesses of this camera, it can be a very powerful production tool.
And the second-generation camera, the AG-DVX100A, is even better. I've scattered comments on the 100A throughout.
The page is a stream-of-consciousness ramble through various issues as I collect information and generate tests. Don't expect a lot of organization or comprehensive coverage (and don't bookmark anything here except the page itself; anchors come and go).
 The
DVX100A (and B)
The
DVX100A (and B)
The DVX100's successor, the DVX100A, was announced on 2003.11.19 at
InterBEE (International Broadcast Equipment Exhibition; Japan's own
version of the NAB show) in Chiba City, Japan. The day before the announcement I had a loaner pre-production prototype in my hot sweaty hands, courtesy of Stuart English at Panasonic.
I put it though its paces alongside my DVX100, and the full review is currently available on DV.com (registration required: not too onerous, and no, I haven't been spammed as a result. DV needs the demographic data to justify ad rates to advertisers, that's all).
Remember that this was a preliminary review based on a pre-production camera. Some of the details may have changed in production cameras, although little if anything appears to have.
To summarize the changes made in the DVX100A as compared to the DVX100:
- Video
- In-camera 16x9 using 4x3 CCDs; very good in progressive mode
- More gamma and matrix settings; knee present in cine gammas; more
latitude (pix below)
- Adjustable knee in video gammas: auto, high, mid, and low settings
- Adjustments for vertical edge enhancement and detail coring
- New color matrices and changes in color rendition
- M.O.D. at telephoto reduced from over three feet to 1 foot 8
inches (i.e., from 50 to 37 units)
- New prism for improved color reproduction; less flare
- Slow shutter speeds: as slow as 1/6 in 24p, 1/4 in 60i and 30p
- Audio
- Perfect audio/video sync at 60i and 30p; much better than DVX100 at 24p
- Progressive
- Gain boost (to +12dB) and color bars in progressive shooting
- Focus assist in progressive (auto-focus, but slow!)
- Instantaneous switching between progressive and interlaced modes
- Operations
- EVF DTL peaking in the EVF and on the LCD to improve
focusability! Hooray!
- Zoom ring has viscous drag for much smoother manual zooms
- Raised guards on audio pots and scene file dial
- Slower power zoom speed (30 seconds vs. 15 on my DVX100)
- 3 USER buttons instead of two, and two additional options for those buttons
- VF readout of zebra setting when MODE CHK is pressed; high zebra extended from 100 to 105 units
- Marker numerical exposure readout extended from 90% to 99%, with
a center target zone for the spotmeter shown in the marker
- More scratchproof EVF lens (I am told; I didn't test it!)
- Color / B&W mode for EVF; more EVF and LCD adjustments
- MODE CHK shows user button settings
- Improved lens cap
- The stabilizer still clunks when the camera is shut off and tilted back and forth.
- The color saturation patterning problem still exists.
- Same size, weight, lens threading, tripod socket, etc.: all DVX100 accessories will fit the DVX100A.
- Same exposure responsiveness, manual controllability, etc.
Delivery date? Shipping: folks had them in their hot sweaty hands in January 2004, just as Panasonic promised.
MSRP? US$3995. Reputable dealeras have them as low as US$3500 (as of January 2004).
Is it worth getting a DVX100A model instead of a used or discounted DVX100? The plain old 100 is still a mighty fine camera. I still have my 100, and I haven't even begun to exhaust its capabilities yet. I'll probably upgrade to a 100A at some point, but it'll be driven by a specific job; I can't justify the upgrade on its own merits unless those merits include significant paying gigs, grin.
In late 2005, Panasonic announced the DVX100B. While the main purpose of the B model was RoHS compliance (Reduction of Hazardous Substances in manufacturing, required in the EU starting in 2006), Panasonic squeezed in a few additional improvements, such as sharper EVF and flip-out LCDs, true 16x9 monitoring, more remotely-controllable functions, and FireWire scene file transfer. See http://www.dvxuser.com/articles/100b/ for
details.
What's the DVX100P? What happened to the DVX100, no P?
Don't panic. They're the same thing. All the literature talks about the DVX100, and that's what you order, but when the box arrives it says DVX100P on it. The DVX100A, of course, is shown as DVX100AP.P stands for "Panasonic, North America"; it doesn't stand for PAL the way it would on a Sony cam. If this were a 625/50 ("PAL") camera, it would have the E (Europe) suffix instead of the P.
How is 24p recorded? What's the difference between 24p and 24p Advanced?
The camera can capture interlaced footage at 59.94 fields/second or 29.97 frames/second ("60i"), 29.97 progressive-scanned frames/second ("30p"), or 24 progressive-scanned frames/second ("24p").The recorder (and indeed all the video I/O) runs at 29.97 frames/second, interlaced, all the time, regardless of what the camera is doing.
When the camera is running in 60i or 30p, the incoming video is placed into a frame buffer, compressed with the DV codec, and written to tape and/or sent out FireWire. That same frame buffer feeds the analog outputs, one field after the other. Whether the images come in interlaced or progressive, every 30th of a second well, every 29.97th, but let's keep it simple for now an image gets written to the frame buffer, and an image gets played out: two fields compressed as a frame for FireWire and recording, and two fields sent out one after the other for interlaced analog I/O.
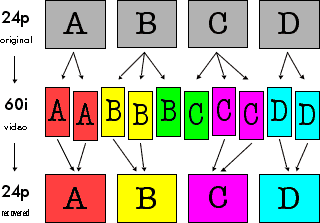
24p is a bit more complex. [Of course, it's really 23.976p, the same way 30p is really 29.97p and 60i is really 59.94i, and even those numbers are approximations. When the National Television Systems Committee added color to the existing monochrome standard in 1953, they had to fudge either the picture frequency or the audio subcarrier frequency by one part in a thousand, to keep the color subcarrier from interfering with the sound subcarrier. Sound won; NTSC pictures now run at 30 * 1000/1001 fps (and that number is exact), and ensuing generations have had to struggle with the peculiarities of drop-frame time code and resetting their master clocks every day to account for drift. But I digress...] 24 does not fit so cleanly into 30; for every four frames of 24p video that go by, five frames of 30p (or 60i) video go by. Another way to look at it is that 24 frames of 24p video have to be squeezed, stretched, and mashed into 60 fields of NTSC-compatible video; that's four frames of 24p per ten fields of 60i.
There are several ways to do this; the AG-DVX100P and AJ-SDX900 offer two: 24p, which I call 24p Standard, and 24p Advanced.
 24p Standard utilizes the same 2:3 or 3:2 pulldown cadence long
used to transfer 24fps film to NTSC video. The first 24p frame is written
to two fields of 60i video, the next is written to three, the next to two,
and the next to three again, as shown in the graphic.
24p Standard utilizes the same 2:3 or 3:2 pulldown cadence long
used to transfer 24fps film to NTSC video. The first 24p frame is written
to two fields of 60i video, the next is written to three, the next to two,
and the next to three again, as shown in the graphic. This cadence offers the smoothest possible raw conversion between the frame rates, and gives us the familiar judder of film transferred to tape. There are a couple of things to notice about it:
1) The "A frame" is defined as the only frame of 24p that occupies exactly one whole frame of 60i video with no overlap into adjacent frames.
2) The A, B, and D frames can be recovered by using two fields from the same 60i frame. The C frame cannot be; it is split across field 2 of the third (green) 60i frame and field 1 of the fourth (magenta) 60i frame. In an intraframe-compressed format like DV, that's an important distinction: the two fields of each 60i frame are compressed together, as a frame. If the two fields are very similar, as happens in the red, yellow, and blue frames, the compression uses a comparatively efficient "8x8 DCT" mode. If the fields are very different, as happens in the green and magenta frames when there's a lot of motion between the B, C, and D frames, a less efficient 2x4x8 DCT is used, possibly leading to more image degradation in those frames compared to their red, yellow, and blue companions.
Furthermore, the original A, B, and D frames can be copied in their compressed form from the 60i video data into a new 24p data file, but recovering the C frame requires decompressing the green and magenta frames and recompressing them into a new, 24p DV frame. That puts the C frame a generation down compared to A, B, and D.
If the 24p extraction tool uses white instead of superwhite codec ranges, as Cinema Tools does, it will clip whites in doing so you really have to preprocess all your footage prior to reverse telecine to pull superwhites and saturated colors into range. Note that this is not necessarily an indictment of such tools: codecs that run in a white-only range instead of a superwhite range can eke a little bit more quality out of the in-range image, at the expense of the out-of-range data. However, if you're using the extended dynamic range that superwhites give you in acquisition, it means you have to add that extra processing step to pull your superwhites back into range before converting to 24p, lest the conversion hard-clip your C frames and remove that creative control from your domain.
 24p
Advanced uses a syncopated 2:3:3:2 pulldown cadence to stuff 24
frames into 60 fields. It's ever so slightly different in its playback;
the standard cadence of 2:3:2:3:2:3:2:3... evenly intersperses the "short"
and "long" frames, while 2:3:3:2:2:3:3:2... lumps two "short" frames
together followed by two "long" frames. The difference is subtle, but can
be seen on smooth pans or on regular in-frame motion, like the passage of
a train. In my experience so far, about half the people looking at a 24p
Advanced clip can see that the motion is a bit different, and half cannot.
24p
Advanced uses a syncopated 2:3:3:2 pulldown cadence to stuff 24
frames into 60 fields. It's ever so slightly different in its playback;
the standard cadence of 2:3:2:3:2:3:2:3... evenly intersperses the "short"
and "long" frames, while 2:3:3:2:2:3:3:2... lumps two "short" frames
together followed by two "long" frames. The difference is subtle, but can
be seen on smooth pans or on regular in-frame motion, like the passage of
a train. In my experience so far, about half the people looking at a 24p
Advanced clip can see that the motion is a bit different, and half cannot.But 24p Advanced isn't intended for making the 60i video look like film; it's designed to allow the best possible recovery of the original 24 frames. You'll note that all four original frames can be recovered from self-contained 60i frames; the green frame in 60i now contains the "extra" B and C fields and can be discarded, since all the information for B is contained in the yellow frame, and all the information for C is in the magenta frame.
Extracting a true 24p clip from a 60i recording simply requires copying the raw data for the red, yellow, magenta, and blue frames into a new 24p file, skipping the green frame altogether. No decompression or recompression is required, and all recovered 24p frames retain first-generation quality. No clipping or other loss is incurred; you are still working with all your frames in their first-generation glory in 24p.
Indeed, Cinema Tools goes one step farther: it gives you the choice of either creating a new 24p file, or simply rewriting the Quicktime frame pointers in the original file to skip over the green frames! Rewriting the header is much faster (not that Cinema Tools is slow in writing a new file), but your "new" 24p file is about 25% larger than it needs to be, since it still contains the discarded frames, and you can no longer go back to that file and play it as a 60i file: Cinema Tools has no "undo" for rewriting the frame pointers.
When to shoot 24p? 24p Advanced? 30p? 60i?
The general rule is to shoot 24p Advanced if you want to extract the original 24 frames/second for a 24fps edit or film-out. Shoot 24p Standard if you are going to stay on video and edit at 30 frames/seconds (60 fields/second, i.e., plain ol' video at NTSC frame rates), without extracting the original 24 frames into a 24fps timeline. In more detail:Shoot 24p Advanced for:
- Post-production using tools that understand Advanced pulldown. 24p Advanced footage can be turned into pure 24p footage more cleanly than 24p standard footage, because every frame in the pure 24p timeline is pulled from a whole frame in the 24p Advanced footage, whereas the C frame in 24p Standard footage is split across two different source frames as discussed above.
- Getting the film look on video when you're staying on video and editing at 29.97.
- Intercutting with film transfers also using 3:2 pulldown, and staying on video at 29.97.
- Working with traditional film-on-tape tools that understand 3:2 pulldown, but not 2:3:3:2 advanced pulldown, when you need to extract the 24p footage for true 24p processing.
- Getting true progressive pictures with a 30 fps frame rate, as when pulling stills for motion analysis.
- Working alongside Canons and older Panasonics in Frame Movie Mode, when you want to match their motion rendering.
- You want the slightly "filmic" motion of 30p, but don't want to go to 24p, and you aren't concerned about ever going to film or converting to PAL.
- Anything that you want to use as plain ol' video at NTSC frame rates: in 60i, this camera makes pix that look (from a motion-rendering standpoint) just like the pix from any other video camera.
- In other words, use 60i for everything that isn't supposed to look
like film and doesn't need progressive scan!
16x9?
The DVX100 is 4:3 only, although it has a built-in letterboxing mask leaving about 372 scanlines (NTSC) shown: a bit taller than the 360 lines of true letterboxed 16x9. Panasonic had a firm target of US$4000 or less, and built-in 16x9 would have broken the bank.The DVX100A adds a digital squeeze mode; in progressive it's as nice as a 360-line upconversion can look, although in interlaced I'd rate it very slightly worse than a PD150's built-in 16x9. Pix in my review on dv.com.
Panasonic's own 72mm 16x9 anamorphic adapter, the AG-LA7200G, is available with a list price of US$940 and street prices around $750-$850. It's compact (2.5 inches / 6.5cm long) and lightweight (under a pound / .43kg). In my work with it to date, I've been quite pleased. It's fully zoom-through without vignetting, and usable at full aperture at wide angles. As you zoom in, you'll need to stop down (also as you focus closer); I've made a chart mapping the combinations of zoom, focus, and iris necessary to retain critical sharpness. At wide angles (and I mean wide: the adapter widens the existing 4.5mm wide angle by about 33%!) there's some barrel distortion visible (though no more than the un-adapted lens shows; the adapter adds none of its own), but it's not so bad as to be unusable for most purposes. At 6mm the lens is quite rectilinear with or without the anamorphic.
The adapter has a .5 inch / 1.2cm fixed "shorty" lens shade, really more of a rim to protect the front element from scratches if the lens is set face-down on a table. The front of the adapter is not threaded for filters nor is it fitted for accessories, so adding a matte box / filter holder on support rods is probably the way to go (see below).
Given the extreme depth of field at wide angle, I'd be tempted to interpose any really necessary filter between the camera and the adapter to avoid showing too much dust in the picture, and leave the rest of the filtration for post. Before critical takes, I'll zoom out, manually focus to MF14, and see all the dust on the front glass in sharp focus. I then clean the lens with a microfiber cloth while watching the monitor!
There may have been some quality-control issues on the initial shipment of these adapters. Early adopters have reported two problems: lenses fresh out of the box with dust between the elements (which often shows up in the pictures since the depth of field is so high), and a fragile lens coating that peels off (!) when the lens is cleaned. I haven't seen either problem on the four or five samples I've seen so far, and the one I bought is internally spotless and undamaged by gentle cleaning.
Century Optics is reportedly working on an anamorphic adapter. Optex is also said to be developing a 72mm native widescreen adapter. The current OpTex adapter (distributed in the USA by ZGC) can be fitted, but only works from 12mm to 45mm; any wider and it vignettes. Street price on these 72mm native adapters (which should also work on the Canon XL1) will probably run between US$1500 and $2000.
There is some concern that the lens front on the DVX100 may not be sturdy enough to support the big adapters and that support rods may be needed. A support rod adapter will of course add to the cost, but the upside is that, if properly designed, the rods will accept standard cine accessories, and CineTech and others now offer clamp-on lens adapter rings for follow-focus controls that ride on standard 15mm rods, as on this PD150. Read on...
Cine-Style Accessories
Cine-style accessories are now available for the DVX100. 16x9 Inc supplies a variety of standard Chrosziel accessories that work well fitted to the DVX100, riding on 15mm rods. Century Optics provides a follow-focus gear that meshes with standard cine follow-focus setups; it includes a white focus-marks scale. Chrosziel builds a lightweight support rod system for the DVX100, part # 401-46, MSRP US$385as of July 2003, Abel Cine Tech sells it for US$327 (this price is for the camera plate with the rods; anything you want to put onthe rods is an added cost, of course!). The Chrosziel kit, including the 4x4 sunshade, currently works with the stock lens and perhaps with the smaller lens adapters, but if you use it with the LA7200 anamorphic adapter, you'll need to cut back the short shade on the adapter to fit. ZGC offers this service for around $150. The rig shown was seen at DV Expo East 2003 in Century's booth.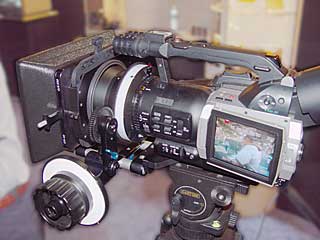

It appears that CineTech (not the same company as Abel Cine Tech!) now has both a camera plate with 15mm rods and a focus gear designed for the DVX100. CineTech kit is more expensive, but it's premium stuff: cross-braces drilled out for lightness; elegant wood focus knobs. CineTech offers a large swing-out matte box with filter holders that should work with most lens adapters; see the CineTech kit fitted to a Sony DSR-PD150.
Jerry Kosan makes a nice selection of cine-style accessories (matte box, follow-focus, handgrips, etc.) for the DVX100; his XL1 accessories should work fine on the XL2, too. www.jbkcinequipt.com
CineTech, Hollywood Studio Rentals, Moviola, Band Pro, Abel Cine Tech, and other film-equipment sales and rental houses are good places to look for this stuff.
Does a follow-focus with focusing scale make sense? Certainly! Once the DVX100 is powered up, calibrate the ring to infinity and set the focus limits on the adapter ring; the focus will track consistently from then on. As long as you don't turn it past the limits, it will repeatably hit any marks you make on the white focusing scale (at least if you don't spin the ring too quickly or too slowly; but I have not been able to fool the zoom at all in my tests).
(Thanks to Jeff Giordano at 16x9 and Jeff Lawson at Abel Cine Tech for their help with the support rod details!)
Handling the Zoom
Unlike most low-cost cameras, the DVX100 has a mechanically-coupled zoom. Unfortunately the short throw of the zoom ring (90 degrees from full wide to full tele) and its light feel make it very sensitive to minor motions. It's quite difficult to do a smooth, slow creep or to ease into or out of a move with your bare hands. The DVX100A is much better in this regard as it has enough viscous damping to allow a smooth manual zoombut a delicate touch is still required.Normally one adds a zoom lever to mechanical lenses to smooth out one's operations. There is a tapped socket on the zoom ring, but it's very small and any lever threaded to fit would be in constant danger of breaking off. What to do?
I took a piece of string about two feet (70cm) long and taped each end to the zoom ring with small bits of gaffer tape, so that it formed a loop around the lens.
With right hand on the tripod handle and left hand tugging gently on the loop, I can now zoom slowly and smoothly. Because the feel of the zoom is so light there's so little drag all it takes is a gentle pull to turn the zoom ring. It looks funny, but it works; it's hard to break off; and the price is right!
The ZOE-DVX zoom controller allows smooth, stepless zooming using the camera's built-in motor, but it's limited in its slowest speeds by the nature of the the DVX100's motorized zoom system (the Varizoom controller is almost certainly similarly constrained). Getting a fully smooth motorized zoom that can cleanly ease in and out of moves will probably require a gear-coupled external motor riding on the support rods described above. Sadly, I know of no such zoom controllers at present.
Focusing by the numbers
The DVX100, like most servo-lens cameras, doesn't have an engraved focus scale. It does, however, have a focus readout in the viewfinder, which runs from 00 (near) to 99 (far) in arbitrary numbers. Eric Petersen has posted a focus chart on his site translating the numbers into both English and metric measurements making tape-measure use practical with the camera; sadly, the chart only lists focus numbers from 50 ("50%") upwards. (The lower numbers are only available when the lens is wider than full telephoto; the wider the lens, the more near-focus points are available.)I've found that focusing by the numbers in the finder works just as well: Once I set my marks and memorize the numbers, I can easily and repeatably return to them. If the LCD is flipped around and folded back against the camera, a 1st AC or focus-pulling assistant can use the numbers, too.
Why no colorbars / gain-up / autofocus in progressive mode?
The DVX100A does allow colorbars, gain-up (to +12dB), and focus assist in progressive, but the DVX100 does not.Why no colorbars? Only Panasonic knows... my guess is that they're being generated in a part of the 60i pipeline bypassed or disabled in progressive-scan modes. No, it makes no sense on the face of it, but I've seen enough similar bizarre limitations in IC designs that I wouldn't rule it out. Fixed in the DVX100A.
Gain up? Gain up in 24p was present in the prototypes if the scuttlebutt is correct. Panny pulled it, they say, because all the filmmakers they talked to said they wouldn't use it. An iffy call perhaps (what about those documentary shooters who need gain boost?), although the gain-up chroma noise is such that I'm not sure I'd use it (remember that noise is 1.4x worse in proscan because of single-row readout; signal drops by half but noise drops only by one over the square root of two).
Another reason I've heard from the Panny folks is that gain boost screws up the Cine-like gamma computations. As Cine-like gamma can be selected in interlace and the gain boosted with no more than the expected deleterious effects of added noise, I find that explanation puzzling.
I'm happy to report that gain-up on the AJ-SDX900 is available in 24p modes, and it looks very clean. The DVX100A allows it, too.
Autofocus? Panasonic says that autofocus hunting is too noticeable on the big screen and that's why they turned it off in 24p. I only wish the EVF were sharper so I could manually focus with assurance (can I transplant my PD150's EVF? Or steal the CRT off the DSR-500 or the AJ-SDX900? The DVX100A adds a peaking function called EVF DTL that helps out considerably).
There's another reason, too, and this one is a killer. 24p autofocus would run, at best, 2.5x slower in 24p mode than in 60i mode, because its raw data is only coming in 40% as quickly. My gut impression is that it'd be only marginally useful at best. If Panasonic boosted the servo gain on it to try to improve speed, it'd oscillate instead of settling down to a steady state.
The DVX100A allows autofocus in progressiven, though Panasonic sensibly refers to it as focus assist. It runs much more slowly in 24p than in 60i (about 1/4 of the speed!) so it's really useful only for setting up on static subjects. When things are moving, you still need to rack manually.
As it is, you can focus by the numbers using the onscreen readouts (in scripted or other controllable circumstances), so the problem is considerably lessened outside of run'n'gun situations. When you have to focus on the run, and there's no big, sharp monitor available, I find it's much easier to focus the DVX100 with the flip-out LCD than with the EVF. Size matters.
Gamma settings
Relative gamma curves for AG-DVX100
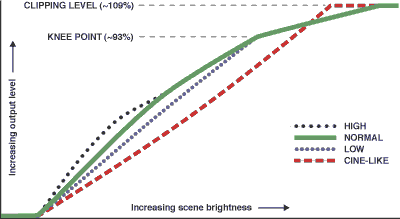
The DVX100 allows the selection of three different gamma curves as shown (The DVX100A has several additional gamma curves, to be posted in the future). The curves were derived by imaging a horizontal luma ramp created in Photoshop and displayed onscreen, and observing the camera's output on a waveform monitor while changing between gamma settings. Thus the curves are relative to one another: the exact curvatures and spacings of the curves cannot be determined from such a test.
High and Low are variations on Normal and are useful in modifying overall tonal balance without changing the way extreme highlights are handled. A fixed knee at around 93% appears to be in effect regardless of scene brightness, above which the tonal curve is flattened somewhat severely to eke out as much highlight detail as possible before clipping sets in, and to smooth the visual transition from normal tonal rendering to the undifferentiated flat white of severe overexposure.
The price one pays for the knee are a noticeable transition in tonal gradients at the knee point, and some hue errors as colored highlights are differentially compressed. These errors are common to knee circuits and are not unique to this camera.
By comparison, the Sony PD150 appears to use a content-dependent knee like the "Dynamic Contrast Control" on its big brothers the DSR-300, 370, 500, and 570. The knee point on the PD150 seems to vary between 80% and 100% depending on the amount of bright elements in the scene, and the slope above the knee is less harshly compressed, so the visibility of tonal gradient changes and hue errors is somewhat less. However the effective latitudes of the DVX100P and the PD150 are extremely close; the PD150's lower knee point (at its maximal effect) is offset by its lower peak compression.
Furthermore, while the Sony would seem to hold colors more accurately as brightness is pushed above 100%, the Panasonic appears to hold more luma detail: overexposed foliage on the Sony holds its hue but "mushes out" any detail whereas the Panasonic's rendering will bleach out more color but preserve more detail. In practice I cannot yet predict which camera will make a more pleasing rendering of a given scene; sometimes the Panasonic does, and sometimes the Sony does.
Cine-like gamma does as little image-distorting processing as possible, giving you the widest tonal scale it can without knee compression or hue distortion. At first glance Cine-like images look flat and a bit underexposed, but when watched in a darkened room (as films are watched in theaters) they look highly naturalistic and dare I say it? more film-like than images shot with the other gamma settings.
The caveat is that there is NO highlight compression at all: the tonal scale runs smoothly right up to 109% and then whacks right into a flat white ceiling. Unless your lighting conditions are well controlled, you will almost certainly have some highlights in the image over 109%, and they may stand out as disembodied pools of undifferentiated white. To fully exploit Cine-like gamma requires you to handle these highlights yourself in post production; you can't just leave them in, uncorrected, and let the flattened knee of the curve smooth the transition between a normal tonal scale and overexposure, because Cine-like gamma has no such knee.
Improved latitude on the DVX100A:
The DVX100A has three different cine gammas, CINE-LIKE, CINE-LIKE_D (dynamic range) and CINE-LIKE_V (video). All three have knees. CINE_LIKE is for compatibility with the DVX100; think of the other two as the counterparts to film rec. and video rec. on the Varicam: similar, but with _v boosting midtones, more like the normal video gammas do.Here are some frame grabs that illustrate the differences:


All images shot at f/2.8, 60i @ 1/60 sec, +6dB gain. Note that some computer monitors (including many LCDs) crush shadows and can't be adjusted to show them properly; look at these pix for highlight detail and clipping and for overall gamma, not shadows.
Matrix settings
The camera has three color matrix settings: Normal, Fluorescent, and Cine-like. Fluorescent boosts the reds compared to normal, giving richer flesh tones under red-deficient fluorescent lighting. Cine-like appears to boost all colors equally, as if one left the camera in Normal but then increased color saturation overall.The A model adds Enriched to the matrices, and all color renditions are a bit different. Descriptions and vectorscope pix in my review at dv.com.
John Beale has some good comparison pix for both matrix and gamma changes.
Strange noises & Construction
 When the camera is switched off or put into VCR mode, parts of the lens
assembly (possibly the optical stabilizer or the focus mechanism) clunk
loudly as the camera is tipped back and forth. This is normal.
When the camera is switched off or put into VCR mode, parts of the lens
assembly (possibly the optical stabilizer or the focus mechanism) clunk
loudly as the camera is tipped back and forth. This is normal.The autofocus motor makes a lot of noise as it locks in on a focus point. You'll hear it through the built-in mics, and you'll hear it by ear in a quiet room. It's noticeable because it's intermittent and because most other cameras are quieter in this regard, but usually the autofocus motor isn't much louder than the zoom motor or the tape transport.
The camera's main casting is magnesium, which contributes to its high strength-to-weight ratio. I was surprised to see the lens barrel is part of the casting: on the finished camera I had the impression it was plastic.
So far, my camera has held up solidly despite a couple of inadvertent hard knocks, though one correspondent reports that his flip-out screen was damaged when the tripod-mounted camera was knocked over and fell on the floor.
Why do the DVX100 stills at 24p.com look so different?
Michael Phillips had enlargements of DVX100 frames posted at 24p.com (partially available at archive.org; look at the differences in the red patches on the GretagMacbeth chart images) using two different pathways from DV to RGB: exports using the Apple DV codec, and exports using the Avid XPressDV 3.5 codec. The frames look quite different in terms of tonal scale and chroma edges. Here's why:Gamma
The Avid DV codec decodes DV's Y'CrCb data to RGB for display linearly. Apple's DV codec adds a gamma correction!Unlike every other DV codec I've seen, the Apple codec gamma-corrects imagery to compensate for the difference between a video display's 2.2 gamma and the Mac's standard 1.8 display gamma. Apple does it so that what you see in on the Mac's screen translates well to video and vice versa (unless, like me, you're already running your Mac at 2.2 display gamma for working in Photoshop and Illustrator, and with all the other video codecs available!).
It makes side-by-side comparison between Apple DV exports and other DV exports very difficult unless you uncorrect the gamma in the picture prior to export. It also means that you have to precorrect CGI (computer-generated imagery) with a complementary gamma correction if you want that CGI accurately portrayed on video when using Apple DV.
I should mention that the gamma change is bidirectional -- what's done going from Y'CrCb to RGB is undone in the other direction -- so it won't accumulate over multiple compression cycles. But you do need to take it into account when exporting from Apple DV to other formats, or importing other formats into Apple DV.
I have lobbied for a prefs setting to enable/disable gamma tweaking to no avail: the Apple DV codec has that built-in gamma conversion (about 1.22 in one direction and 0.82 in the other) and we just have to live with it if we want to use that codec.
To correct material imported into Apple DV, try a gamma precorrection of 1.228. To gamma-correct on export from Apple DV, 0.824 works pretty well (with a tip of the hat to Chris Meyer for these numbers!).
Chroma Interpolation
The Avid exports show fairly smooth chroma transitions, while the Apple codec clearly shows the steppy edges in chroma that are the bane of DV's existence.This is not a bug in the Apple codec per se (although if you're decoding to uncompressed for post work, it requires an extra processing step; see below). There is only one chroma sample horizontally for every four luma samples. The Apple codec outputs a 4:4:4 RGB image by replicating each color sample across the next three pixels; it does not try to smooth or interpolate the data between samples.
The Avid codec applies a low-pass filter to the decoded chroma data to more smoothly interpolate between samples (notice how the saturation on any color patch starts fading out before the edge of the patch is reached). As a result the Avid codec makes a more pleasing RGB image on the 1st generation decompression, but if carried through a couple of cycles the color will soften and smear more than occurs with the Apple codec.
On the SDI capture (not currently posted, but it looked very much like the Avid exports) there is also filtering & interpolation going on, the details of which depend on how one is getting the SDI signal from the DV original: the 4:1:1 to 4:2:2 conversion in the deck's hardware almost certainly interpolates the chroma prior to output, and the 4:2:2 codec used in the NLE may likewise low-pass or interpolate further to get 4:4:4.
[Generally speaking, the Apple DV codec is designed to preserve the original 4:1:1 data as accurately as possible over multiple generations. Compared to Avid, it hold more high-frequency data in the luma, and better preserves the chroma but it is also more prone to mosquito noise compression artifacts as a result of preserving the hard-to-compress detail, and its RGB decodes have unsmoothed, steppy edges.
The Avid DV codec, by contrast, was specifically optimized for the fewest compression artifacts and the most visually pleasing picture, at the expense of some high-frequency detail. Compared to Apple, its images often look cleaner in the first generation, albeit a bit softer (look at the text on the color-checker chart, for example). ]
If all you're doing is capturing via FireWire and editing in DV25, the Apple codec in my experience holds more fine detail and preserves the image better over multiple generations (but compressing sharp-edged CGI requires more aggressive low-pass filtering on input to avoid generating mosquito noise). However, you will see the sharp-edged, unfiltered chroma on extracted stills, just like the 24p samples show.
In such a case the Avid codec yields nicer stills, but you'll see a progressive softening and blurring of chroma with each generation no big deal on 1 generation (and don't get me wrong, the Avid codec is, along with Apple's, among the best I've seen) but if you're going between an NLE and a compositing app using DV25 compression as your intermediate [hint: don't do this], or repurposing material from previously-edited DV material on a new DV project, the softening from multiple passes can be noticeable.
Remember, if you're going back out FireWire, the final decode and associated chroma interpolation is done by the hardware codec in the VTR, and the difference between the Apple and Avid codecs and the way they interpolate chroma for RGB viewing is irrelevant!
If, however, you're bumping up to uncompressed for editing and output, you do want to perform some form of chroma smoothing or interpolation upon initial decompression from 4:1:1 DV to 4:2:2 uncompressed. Likewise, doing a chroma-key in DV without chroma smoothing is an exercise in frustration, and as the 24p pix show, it's a useful thing to do before exporting stills.
What to do? You can use a codec that performs the smoothing by default (like Avid), or by choice (Matrox's software VfW codecs let you switch chroma interpolation on and off), or use the Apple DV codec and add a chroma-smoothing filter. I have one for Final Cut Pro here.
But, I repeat, this is only useful/necessary if/when you're bumping up to a higher-resolution format, exporting a still image, or chroma-keying it doesn't do you any good when decompressing DV only to recompress to DV.
So it's a tradeoff, as it always is when going between higher- and lower-resolution color spaces: preserve the low-res data unfiltered, with the resulting visible artifacts in the higher-res space, or smooth the data for better display at the expense of multigeneration accuracy.
The chroma-patterning problem
Close examination of DVX100 and DVX100A pix reveal that highly saturated colors of a certain width, or the edges of large solid areas of saturated color, show a position-dependent variation in saturation. At approximately 60 positions evenly spaced across the screen, saturated color details or edges will desaturate slightly. It's completely unnoticeable on static images or in the interior of large colored areas, but is revealed on edges and details in slow pans, as the colors pulsate slightly.I've got a sample clip here (loads in a new window). I took the highlighted 72x48 pixel area from a slow pan past a bookshelf. The arrows at the bottom of the clip show the position of each four-pixel-wide DV chroma sample; the arrowheads at the top mark locations of peak chroma saturation. The sample is twice normal size, and the pixels were left as square, not resampled to account for their original 0.9 aspect ratio. The source was decompressed with Apple's codec (which does no chroma smoothing, as described above) with a slight horizontal chroma blur added to reduce chroma aliasing prior to re-encoding to Sorenson3. The resulting image is very close to what you'd see looking at a video output; the recompression for the web has not added nor subtracted any substantial artifacts.
As the sample shows, it's most visible in bright, saturated reds and oranges. In practice, I'll see it most often in traffic lights, orange traffic cones, backlit store signage, and similar footage. It also shows up on strongly saturated greens and blues (which has implications for chroma-key work) and is present on less saturated colors as boosting saturation in the NLE will show, but such errors are visible much less frequently than in the bright reds.
How bad is it, really? I didn't notice it myself until I'd had the camera for two weeks, and only then when I had the monitor's saturation maxed out for a color test. Now I know what to look for, though, I can see it in other pix both from my camera and from others even on normally set up displays.
But to put it in context, the horizontal aliasing from a PD150 with the "sharpness" set to the default position or higher is more immediately noticeable, to my eye at least, and I don't see people getting upset about that.
I've shot a fair bit more with the camera since first seeing saturation patterning, including many shots with bright reds in clothing and in backgrounds. I'm pleased to say that the visibility of the patterning is minimal or nonexistent on the vast majority of things I've shot.
However it does affect chroma keying considerably, I'm sorry to say; I would recommend against planning any detailed chroma-keying with DVX100 footage without performing careful tests first. Both the hue and saturation channels are affected by 60-times-across-the-picture fixed patterning, and keys depending primarily on hue and/or saturation tend to show the pattern in the edges of moving items. Luma keys, however, are excellent, and chroma keys where luma is the primary edge-definer (chroma being used only to differentiate similar tonalities in the foreground and background) can be quite acceptable. Test, test, test!
Audio / video sync
While I was shooting some A/B comparisons using a slate (filmmaker's clapstick, seen in the graphic at the top of the page), I found that the audio on my DVX100 leads the video by one frame in 60i mode. DVFilm reports that all 24P Advanced footage has a 2 frame audio lead.The audio advance is constant; it does not drift during a shot or from the beginning of the tape to its end.
The audio advance happens during recording: my 60i DVX100 source tape played back in a DHR-1000 with jog audio enabled plays the snap of the clapstick a frame or two ahead of the picture where the stick hits the slate. Capturing the clips into a variety of NLEs confirms the one frame audio advance in 60i, and up to two frames in the progressive modes.
Don't panic! While this is annoying, it's not crippling, and you can fix it in post (yes, yes, I know: why should we have to fix it in post? Don't like it? It's a free country; go get an HDC27 Varicam or F900 CineAlta instead. It's only money, i.e., $65,000+ to buy or $1200+/day to rent. Me, I'll just fix it in post). It's also mostly fixed in the DVX100A; see below.
And if you're shooting 60i material, most folks won't even notice it. It took me a couple of months to find it, and no one else seemed to notice for about the same period of time. It ain't the end of the world.
How is this possible? Consider that a frame's worth of video must be buffered before it can be compressed and written to tape, even in 60i. For audio to line up properly, it has to be buffered (delayed) accordingly before it's multiplexed with the compressed DV data. It appears that there is no audio buffer in the DVX100. But this turns out not to be unique to the AG-DVX100! Read on... (Don't care to read on? Cut to the chase instead.)
Stuart English, VP of Marketing for Panasonic Broadcast, explains it this way (as originally posted on 2-pop's AG-DVX100 forum on 2003.01.10 and reprinted with Stuart's permission):
[A]ll the DVX100's out there will behave the same, they have the same audio / video sync characteristic...Now how much would you pay? But wait, there's more! I went back to study my sync tests and shoot new ones. Instead of the clapstick and its temporal uncertainties, I instead flicked a business card past my finger: in the still frames, I can see roughly where in time the card hit my finger as it motion-blurs past. I shot tens of seconds while flipping the card rapidly back and forth about four feet in front of the cameras using their own microphones; played it back frame-by-frame on a VTR; and studied the clips in both Final Cut Pro 3 (a.k.a. FCP) and Premiere 6.0 on Windows 2000 (using Microsoft's DirectX 8 DV infrastructure). I found some very interesting things...
...[A]ll professional DV camcorders will most likely share this characteristic of audio leading the video. We constructed an electronic audio / video pulse test rig to verify that, and then tested the following DVX-100, PD150, XL-1, GY-300. All except the DVX100 (in 60i mode) have a one field advance between audio relative to video. Based on our test, none have a zero field advance as has been claimed...
Perhaps due to the characteristics of the frame output capable CCD imager, the DVX100 in 60i mode has a two field advance between audio and video. Yes, this is more, but it is something that can be compensated for in an NLE application - just pick up the audio timeline and bump it by 1 whole frame...
Why does the audio advance happen?
Unlike an analog tube camera (where the video lines are scanned and recorded in real time, and the audio is recorded in real time) CCD cameras accumulate charge over the duration of the field (or frame)and then dump that charge at the end of the field (or frame)into the DSP circuits which perform additional signal processing.
Meanwhile the audio is still recorded in real time.
So the signal on tape is video delayed by at least one field, and in the case of the DVX100 in 60i mode, by one frame. The only way out of this is to add an audio delay circuit in to the camera audio paths to add an equal amount to delay to the audio which would put the audio and video in sync again on tape.
At the DV camcorder price level it is too expensive to include such an audio compensation delay, the easiest solution in practice is to slip audio in the NLE if it is causing any annoyance.
Regarding people's comments about "my camcorder is in sync" - there are other factors at work that can bias observations for example- Sound travels much slower than light. Zooming in on a subject 16ft away from you the video arrives approx 16ms earlier than the audio - that's one field time. 32 ft is two field times. So audio on tape might seem to be in sync, or even have the audio follow video. But if you put a mic on that person, and line recorded the audio, it wouldn't be in sync, it would lead again.
b) If you watched your footage on an LCD or plasma monitor, the video would seem to be more delayed than if watched on a CRT - the LCD and plasma have image delay in them because they are not real time scanning devices, they read the data in, convert to progressive scan, and only then display it.
c) When working in 24P mode, there are two other issues - the video frame rate is lower so it is less certain when the video event actually happened, and due to the need to add 3:2 or ADV pulldown, the apparent audio lead / video delay "wobbles". We think that it should still be 1 frame i.e 2 fields, but because of 2:3 pulldown on the tape it may look like it is sometimes 3 fields. The only way to really test is to use DVFilm to remove the 3:2 pulldown and look at the 24P native footage on the NLE timeline.
Again, audio advance or delay is easily removed by NLE application... as long as the advance or delay is consistent, which it is.
- Capturing in Final Cut Pro 3 on OS X (either 10.1.5, QT 5, FCP 3.0.2; or 10.2.3, QT 6.1, FCP 3.0.4) gives variable delay results: the same clip, shot on any camera, and captured three or four times, shows A/V delays differing by up to almost one frame's time (about 30msec variation) between the different captures. Thus, using clips captured in FCP, unless one has a sync check reference as described below, one cannot make definitive statements about the exact value of the A/V delay, only statements about relative delays between cameras used in the captured clip. Captures in Premiere always line up almost exactly as far as I can see (within 1/10 of a frame or better). (Final Cut Pro 4 on OS X 10.2 fixes sync uncertainty.)
- Within the same capture (i.e., capture of a tape segment containing footage shot on the Panasonic and on a PD150), the Panasonic 60i footage appears to show one frame (two fields) more delay than the PD150's footage does.
- Within the same capture, Panasonic 30p footage appears to have one field more delay than 60i footage does. I re-ran my earlier tests with the shutter set to 1/30 (i.e., as close to a 360º shutter or 100% duty cycle as one can get) and it does appear that 30p footage incurs a 3-field advance instead of a 2-field advance.
- 24p footage shows the variable wobble as Stuart explains, with the apparent delay being 1-2 fields worse than 60i footage.
- Single-framing on a DHR-1000 with jog audio shows a 2-field advance on the Panasonic at 60i; what appears to be 3 fields at 30p; 3-4 fields at 24p or 24p Advanced. The venerable DCR-VX1000, and the $15,000 DSR-500WS both appear to play back with one field of advance! The Sony PD150 appears to play in perfect sync.
- Examination of the clips in Premiere confirms these results. The
PD150 is dead-on in sync while the old VX1000 and the expensive,
professional (but several-year-old) DSR-500 show a 1 field advance.
The DVX100 is 2 fields advanced in 60i, 3 in 30p, and 3-4 in 24p and
24p Advanced (still viewed as 60i source clips).
To test the NLEs' timings, I shot sync check samples with multiple starts and stops using both the DVX100 and the PD150, alternating between (a) a shot of my computer's speakers with loud audio, and (b) colorbars (or the lens capped) with silence. DV audio is interleaved with video data within the frame, so even if there is A/V delay in the process, the cuts between shots should show perfect sync: wiggly audio waveforms for the entire frame in the shots of the speakers, flat audio waveforms for the black or bars. I then followed these sync checks with my flipping-card routine so that the sync check and camera check could be captured as a single clip.
Using the sync check shots, I verified that FCP 3 captures clips with a variable relationship between audio and video (FCP 4 is much better in this regard, especially on OS X 10.2). In the best case, perfect A/V sync is captured to within about 1/10 frame. In the worst case, audio leads video by almost a frame (32 msec). However, using the offset on any given capture revealed by the sync check let me validate the camera check shots with a higher degree of confidence, since I was able to factor out FCP's variable capture timing.
Captures into Premiere showed only a tiny variation in A/V sync check shots. They varied between perfect sync and audio lagging very slightly (well within 1/10 frame) as far as I can see by squinting at the timeline. I reverified all my camera checks in Premiere and found that the camera A/V timing relationships I had seen in FCP were repeated in Premiere.
Item #2 tracks with both Stuart's explanation and (according to Stuart) Michael Phillips' test results showing a one-frame (two-field) delay, if we assume that the PD150 is in fact in perfect sync.
Items 5 and 6 are most interesting. While there is some uncertainty in my VCR playback tests as the DHR-1000 jogs by frames but shows only the second field of each frame (the one more temporally advanced, i.e., the one most likely to line up with advanced audio), the Premiere tests showing waveforms and both fields in the frame confirm them. (Side note: The DVX100 jogs by fields, the only low-cost DV device I know of that does so. Unfortunately it does not play audio when jogging.)
In the PD150's case, I never was able to detect even a field's difference between picture and sound. It was always dead-on perfect, in over 50 card-flipping events. This conflicts with Stuart's test results. (Stuart's tests monitor the audio and video analog outputs on a dual-trace oscilloscope and look for the line-up between the burst of sound and the flash of light from a special test rig he built, so the results of our tests are not directly comparable. I do not have the time presently to replicate his test setup so I can't comment further on the discrepancy between our results).
So I shot several more tests. The sync check shots confirmed perfect capture sync in Premier within 1/10 frame. The PD150 camera checks always showed what looked like perfect sync, or, if anything, up to 1/2-field (1/4 frame) of delay in the audio!
I find it odd that the PD150 appears to be field-accurate while the DSR-500 is off by one, but the PD150 is a newer camera and possibly it has a digital audio delay while the older DSR-500 does not. If the AG-DVX100 is indeed one frame advanced in 60i, my tests would indicate that the PD150 must be sync, because it's two fields less advanced than the DVX100 when footage from both cameras, captured in the same clip, is compared in FCP or in Premiere. For what it's worth, my PD150 is serial #1005564, and it came from the factory with the audio noise fix.
Running the 24p Advanced footage from a perfectly synced FCP capture through DVFilm's Maker with zero frames delay correction and loading into a 24p FCP sequence shows an apparent advance of two frames, or four fields just as Marcus van Bavel at DVFilm observes. Thus the 2 frame delay that the latest versions of Maker provide by default when extracting 24p footage looks to be a good fix.
So, a quick summary of what I see based on FCP and Premiere tests and on DHR-1000 jog-mode playback:
| Camera, Mode |
Audio Advance |
| PD150, 60i |
0 fields, perfect! |
| VX1000, 60i |
1 field |
| DSR-500, 60i |
1 field |
| DVX100, 60i |
2 fields |
| DVX100, 30p (played as 60i) |
3 fields |
| DVX100, 24p (played as 60i) |
3 - 4 fields |
| DVX100, 24p (played as 24p) |
4 fields / 2 frames |
| DVX100A, 60i or 30p |
0 fields, perfect! |
| DVX100A, 24p |
lags
about 1/60 sec |
BTW, I should mention that I worked with Stuart ten years ago at Abekas Video Systems. Yes, he's in marketing (grin), but I've never known him to fudge the truth. If he says he saw a 1 field advance in the PD150 I believe him; we just need to determine why we're seeing different things.
Now, how do you deal with it?
DVFilm's Maker program, as of version 1.06c, incorporates a delay audio option to correct the audio advance, useful if you're extracting 24p from the 60i original.
In-sync's Blade 2 24p-native NLE lets you set the audio advance during capture.
Final Cut Pro 4 includes a "DVX-100 [sic] Audio Sync Tool" allowing you to tweak the A/V sync as you see fit. It's not installed by default: Insert the installation disk, and drag the plugin from Final Cut Pro 4 > Extras > DV Camera Tuner Scripts to [your hard disk] > Library > Application Support > Final Cut Pro System Support > Plugins. When you restart FCP 4, you'll have an "Offset Audio Sync" option in the Tools menu that lets you adjust the sync for one or more selected clips. The default setting of 2 frames is usually correct for the DVX100's 24p footage.
If you're editing 60i directly or using Cinema Tools or other 24p extractors, you can manually slip the audio in your NLE a frame or two to compensate.
And other NLEs may have manual or automatic compensations for the DVX100; just because I don't list 'em doesn't mean they don't exist.
Autoexposure
In a few of the scenes I've shot on auto-iris, I've seen a slight steppiness to iris changes. Instead of smoothly changing from one setting to another as the light levels in the scene change, the iris adjusts in small jumps, just barely visible on the picture monitor and on the waveform monitor.Fast changes look clean, but slow, gradual changes, typically less than a stop every two seconds, tend to show it. Each step is very small, finer than the steps incurred in manual iris setting. The little jumps are slight enough that it took repeated viewing of a scene to confirm that I was seeing something. It's probably happening on faster changes too, but the speed of the change makes the steppiness unnoticeable. I also find that it's very, very hard to make this happen on purpose.
Another reason to run in manual-iris mode for critical work (which we all do anyway, of course. Right?).
Cleaning the lens
 Warning:
Cleaning the lens must be done carefully to avoid damaging it, as is true
with any lens. Removing the anti-reflection plate as described here may
void your warranty. In the process, your lens is subject to damage from
fingers, screwdrivers, loose screws, and the metal edge of the plate. It
is also very easy to lose the tiny screws. Follow this procedure at
your own risk!
Warning:
Cleaning the lens must be done carefully to avoid damaging it, as is true
with any lens. Removing the anti-reflection plate as described here may
void your warranty. In the process, your lens is subject to damage from
fingers, screwdrivers, loose screws, and the metal edge of the plate. It
is also very easy to lose the tiny screws. Follow this procedure at
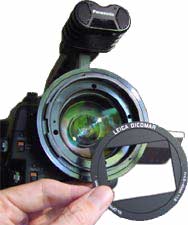
your own risk!The Leica lens has an anti-reflection plate mounted in front of it; it's that thing with the rectangular cutout and with the lens data printed on it. It's there to cut down flare and reflections.
Unfortunately it also makes it hard to clean the lens. With care, you can remove the two screws that hold it in. It lifts off easily, giving you access to the entire front surface of the lens (alternatively: tip the camera downwards, and both the screws and the plate will fall free of their own accord). After cleaning the lens you should replace the anti-reflection plate.
Because this lens goes so wide, and because the camera uses 1/3" CCDs, dust or smudges on the front element are easily seen in DVX100 images. The supplied lens cap doesn't help; it's so finicky in its attachment that it frequently jumps around as you're attaching it or removing it, often transferring finger-cooties to the lens as it flops about.
LINKS
Not comprehensive by a long shot, but enough to get you started... just watch out for the FUD! On the discussion lists especially there are lots of very authoritative statements that are just plain wrong. I don't think it's deliberate, but I see a lot of folks getting in way over their heads with technical explanations based on a lack of understanding or a misunderstanding of how things work.AG-DVX100 - data
- Download PDFs of the camera's brochure and operating manual from Panasonic's "DV World".
- DVX100 Focus Chart translating from "focus numbers" to English AND metric measurements.
- My own Focus/zoom/aperture chart for the LA7200 anamorphic adapter and the DVX100.
- John Beale does great work exploring the camera's operating characteristics and posting useful data (I am puzzled by his audio tests as other competent testers have not seen the same comb filtering, but aside from that I can't disagree with anything he's found).
- I review the camera for DV Magazine (on the website, browse Reviews and scroll down. The DVX100A sneak peek was under Features. Offline?).
- Terrence V Smith's DVX100 Resource page (offline?).
- Mark Foley reviewed the camera for Videography Magazine (no longer online).
- Steve Mullen described 24p to 60i pulldown for Video Systems Magazine (no longer online).
AG-DVX100 - discussions
- DVXuser.com - Forums and tips and reviews.
- Good discussions on the DVX100
Forum at Creative Cow.
- Stephen van Vuuren & Terrence V Smith host the DVX100
discussion at Chris Hurd's DVInfo.net.
Tools for editing/extracting 24p Advanced 2:3:3:2 footage & how to do it
- DVFilm's DVFilm Maker, $95, converts 24p Advanced footage from 60i to 24p without decompressing/recompressing. Maker also converts 24p back to 60i using either standard or advanced pulldown. Very cool tool. Mac/Windows.
- In-Sync's Blade 2, $499, edits both 24p and 24p advanced directly and automatically; no conversion step is necessary as Blade parses the 24p information directly from the captured clips. Windows. Requires dual 933 MHz, single 1.8 GHz, or faster CPUs. (No longer available?)
- Apple's Cinema Tools, now bundled with Final Cut Pro / Final Cut Studio, handles 24p Standard and Advanced. Mac. Final Cut Pro 4.0 and later can capture 24p Advanced directly either during capture or after the fact. (Also note that the lower-cost Final Cut Express cannot edit a 24p timeline.) While FCP can edit in 24p, it can't print 24p back to tape using anything other than 2:2:2:4 pulldown unless you have a fast Mac (FCP 4.0 and 4.1 needed something faster than my 800-867MHz Macs, but FCP 4.5, a.k.a. FCP HD, will add 2:3:2:3 or 2:3:3:2 pulldown on these machines). And FCP has no way to render a 24p timeline to a 60i file! Maker (above) is still a necessary tool for some of us.
- Sony Pictures (formerly Sonic Foundry) Vegas,
$525 and up, edits 24p Advanced footage directly (requires the
downloadable 4.0b or later updater!). Windows.
- Avid Xpress Pro, $1695, can edit 24p and can capture 24p Advanced directly. Mac & Windows.
- (Many other products, including Adobe After Effects, can extract 24p standard footage)
- Digital Alliteration: Panasonic, Progressive, Pulldown and "Pretty Darn Cool", by Charles Roberts on LAFCPUG, covers 24p standard mode pretty well.
- Working with the Panasonic AG-DVX100, Final Cut Pro and Cinema Tools, by Andrew Lau on LAFCPUG, discusses basic Cinema Tools and FCP 3 workflow (with some minor errors: batch processing requires clips that start on A frames, not clips with A frames on 0s and 5s; and batch processing needs F1-F2 or Field 1 Only selected depending on whether you're using 24p or 24p Advanced footage, just like manual processing does).
General 24p Information
- 24p.com has lots of useful info, especially the links on its Resources page.
Other 24p SDTV cameras
- The Canon XL2, US$5,000, has a 16x9 native CCD, 24p and 24p Advanced, and uses all Canon XL-series accessories. Like the XL1 and XL1s (and the DVX100), it records standard DV.
- The Panasonic DVCPRO50 AJ-SDX900, US$26,750, is the DVX100's big brother: 16x9 native, interchangeable lenses, DVCPRO25/50 switchable. It's very sweet!
- The Panasonic DVCPRO50 AJ-SPX800, US$19,500, records on P2 memory cards instead of tape. 16x9 native, interchangeable lenses, DVCPRO25/50 switchable. It's even sweeter!
- Sony's XDCAM camcorders, the DVCAM PDW-510, US$19,900, and the DVCAM/MPEG-IMX PDW-530, US$34,000, offer a 24p option card and record on blue-laser optical disks.
24p HD cameras
- Panasonic's 720p/1080 HVX200, Canon's XL H1, JVC's HD100 and successors: see my reviews on DV.com.
- Sony's XDCAM HD cameras, the PDW-F330 and PDW-F350, shoot long-GOP MPEG; the HDCAM CineAlta series (F900 and successors) shoot DV-derived HDCAM.
- Panasonic's Pro Camcorders page links to the AJ-HDC27 Varicam (DVCPROHD). There's also the AJ-HVX900, the SDX900's HD/SD switchable successor, and the P2-based AJ-HPC2000.
- JVC's prototype 3-CMOS HDV camcorder may well offer 24p in 720 or 1080-line formats.
- Kinetta will be delivering a 24p HD cinema camera; it runs any speed from time-lapse to 60fps, and even offers hand-cranking!
All materials on this page copyright (c) 2002-2007 by Adam J. Wilt.
You are granted a nonexclusive right to reprint, link
to, or frame this material for educational purposes, as
long as all authorship, ownership and copyright information is
preserved and a link to this site is retained.
Copying this material for a publicly-accessible website (instead of
linking to it) is expressly forbidden except
for archival purposes: this page is dynamic and will change as time
goes by, and experience has proven that sites
copying my material do not keep their copies up-to-date, thereby
doing their visitors, themselves, and me a disservice.
Last updated 2007.01.06