| |
DV
Pix
- Multigeneration test images |
|
[updated 16 January 2000]
Multigeneration tests are useful for two purposes: they show off the
strengths and limitations of the DV compression scheme, and they also show
off any weak points in a particular implementation!
DVStressTest is my current test
image.
It's not perfect, but it does have a variety of test subjects:
-
linear and dithered luminance ramps
-
solid patches of color (75% colorbar colors)
-
solid bits of white and black
-
finicky detail
-
straight lines and curves
After rendering one or more generations, the bars can be observed on a
vectorscope; look for saturation & hue changes. Look at the ramps on
a waveform monitor for breaks in continuity, for loss of linearity, and
for changes in levels. Look at the pix on a picture monitor for all manner
of degradations. Extract a frame and take it into you favorite image editor;
blow it up and look at artifacts.
The image DVtest1 is specifically
designed
to be hard to compress; it has "infinite" bandwidth with unnaturally sharp
transitions horizontally, vertically, and diagonally. It has separate luma
and chroma test sections, so that when you pass it through a DV codec
you'll
clearly see the difference between luma and chroma resolutions and
compression
methods. Each 16x16 square and its line of text is displaced one pixel
horizontally and vertically in the DCT block structure from the preceding
line, so each line will compress with different artifacts. Due to the
sharp
edges, multiple compression cycles (generations) will cause an increasing
amount of mosquito noise to appear.
SF, on the other hand, is a naturalistic
camera-captured
image, which despite its high detail is already bandwidth limited by
optical
low-pass filtering in the camera and by one stage of DV compression. You
can take it through multiple generations with little degradation occurring
(or try your own camera-captured images).
Both images can be downloaded for your own tests. They are saved as
TIFF files with LZW compression: this is a lossless compression that still
yields acceptable sizes for transmission. To use them, simply import them
into Premiere or another editing application; if your editor won't import
TIFFs, use PhotoShop or another image editor to convert them to BMPs,
PICTs,
or another native format that your editing application can use. These
images
are 720x480 for 525/59.94 (NTSC) use; for use in 625/50 (PAL) format, open
DVtest1 in Photoshop or another editor and add another 96 scanlines to
make a 720x576 image (do not stretch the original image to fit the
larger vertical space, or you'll destroy the relationship of the lines
to the DCT block boundaries). Don't use "SF" for PAL tests, as its 4:1:1
structure won't be representative of the 4:2:0 images native to PAL DV
formats (except for DVCpro, which uses 4:1:1 in PAL).
I suggest the following two tests. All instructions assume Adobe Premiere
4.2 / 5.X, but other editing applications offer similar operations, so
adjust the steps to suit your system. At each stage, I suggest saving the
resulting clip or still with an easily-remembered name followed by a
generation
number, i.e. "test01", "test02", "test03", etc., so that you can easily
keep track of all the stages of the test.
Test #1: Import/Export
-
Create a new project, selecting your DV codec as the compression method.
-
Import the still image, and place it on the timeline.
-
"Make movie" or otherwise generate a DV-compressed AVI or Quicktime clip
from the still.
-
Open the clip you've just made, and export a still (File | Export |
Frame
as bitmap...). This is the first generation.
-
Repeat steps 2 through 4 as many times as you want, each time using the
result of the previous step as your source image.
-
You can now string together each of the clips created at each stage of
the test and make a new clip combining them all. Play the clip back in
looping mode, and you'll see an "animated" demonstration of the codec's
multigeneration performance.
This test strictly tests the compression/decompression of the codec. On
the first generation, if you're using DVtest1 as your source, you'll see
some artifacts around the text on the luma side, but the text will still
be quite readable. The chroma side will be almost unreadable: 4:1:1 or
4:2:0 coding doesn't provide much color resolution!
Using the Adaptec DVsoft codec in Premiere 4.2, I found that going ten
generations with DVtest1 adds a bit more mosquito noise in each
generation,
but the worst degradation happens with the first compression. Going ten
generations on SF showed no visible difference at all.
Test #2: Processing Inside the Editor
-
Open your editor, and create a new project using DV compression.
-
Import the still, and place it on the timeline.
-
Add a superimposed title, such as "1st generation", in one corner of the
image. Put the title on a solid plinth (a box used as a background for
the text), but leave the rest of the superimposed image totally
transparent.
-
"Make movie" or otherwise render this as a short (1/2 second)
DV-compressed
AVI or QuickTime clip. This is the first generation.
-
Import the just-rendered clip, and place it on the timeline, replacing
the original clip. Change the text of your superimposed title to read
"2nd
generation". Leave it in the same place, so that it covers the previous
title but otherwise does not affect the image. "Make movie" or otherwise
render this 2nd generation.
-
Repeat step 5 for as many generations as you wish.
-
String together all the rendered clips into a single clip, and play them
out in looping mode to see an animation of multigeneration performance
when processing is done inside your application.
This test forces a decompression/recompression at each stage, but
instead of simply exercising the codec this test keeps the image within
the editor and adds processing to it. By adding a title in one corner you
should
be leaving the rest of the image intact, and it should degrade the
same way as in the first test.
What I found using Premiere 4.2 and the Adaptec DVsoft codec on Windows
95 was that the luma information in this test was degraded exactly
as in the first test, as you would expect. Chroma, however,
underwent
a leftwards shift, drifting across the image with every new generation
-- and drifting across DCT block boundaries, too, causing further
degradation.
See the companion page
Pix: Codecs for some
5th-generation tests on another graphic image.
DV
Stress
Test
(c) 2000 Origin8
Video
Note: JPEG
compression shows
artifacts not in the original
|
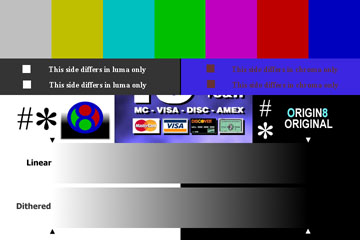
This "pathological" text image is designed to stress the
DV
codec. Ramps show luma accuracy & linearity; bars show chroma
fidelity;
text & graphics show mosquito noise, chroma accuracy, Y/C
delay, etc.
Download DVStressTest.TIF
(116 kBytes)
|
Pathological
DV
test image "DVtest1"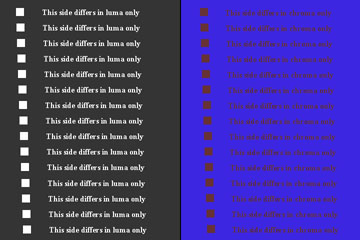
Note: JPEG
compression shows
artifacts not in the original
|
This "pathological" text image is designed
to stress
the DV codec; all the text is rendered with no antialiasing and
the sharpest
possible transitions.
The left side only has luma transitions; the right side has
only chroma
transitions; the luma value of the colors used is consistent (to
a couple
parts in a thousand) using the ITU-R BT601 equations converting
RGB to
YUV.
On both sides, each line of text and its 16x16 pixel box is 31
pixels
lower and one pixel to the right of the previous line. Thus each
line is
one pixel to the right and one pixel up, with respect to the DCT
block
structure*, compared to the previous line; each line will stress
the DCT
coding a bit differently.
Download DVtest1.TIF (53
kBytes)
*DV DCT luma blocks are 8x8 pixels for luma.
In 525/59.94,
the chroma blocks are 32 pixels wide and 8 tall; in 625/50 the
chroma blocks
are 16x16 (in both cases, the chroma blocks are 8x8 samples;
the odd sizes
are due to the 4:1:1 chroma subsampling in 525, and 4:2:0
subsampling in
625 systems)
|
"DVtest1" details

Note: JPEG
compression shows
artifacts not in the original
|
Camera-captured
image
"SF"

(c) 1995 Origin8
Video
Note: JPEG
compression shows
artifacts not in the original
|
This camera-captured image, shot with the 3-chip
DCR-VX1000
and exported from Adobe Premiere using the Adaptec DVsoft codec
under Windows
95, is more typical of the imagery found in video. While "sharp"
edges
are present, they are all prefiltered and bandwidth-limited by the
optical
and electronic processing of the video camera and circuitry -- and
it's
already been DV-compressed once.
This image shows little if any degradation in multigeneration
tests:
I've run it through the codec ten times, intercut 1st and 10th
generation
images in a looped clip, and been unable to see where the cuts
occur. A
mathematical comparison showed only minor differences between
the two images,
mostly around the edge of the building and the sun glare.
Download SF.TIF (526 kBytes!)
Suggestion: instead of using this
image, use one
of your own. I only provide this one as a reference standard,
so that when
I say that I've done the test with a real image, that image is
available
for others to play with to verify my results.
|
Copyright (c) 1998, 2000 by Adam J. Wilt.
You are granted a nonexclusive right to duplicate,
print,
link to, frame, or otherwise repurpose this material,
as long as all authorship, ownership and copyright
information
is preserved, and a link to this site is displayed.
Contact me
via
email
Last updated 16 January 2000.