How To...
- Connect FieldMonitor to a source
- Hide or show onscreen controls
- Show and adjust ’scopes
- Show and adjust markers
- Desqueeze anamorphic pictures
- Flip the image for mirrored / self-shooting mode, low-mode Steadicam, or 3D rig monitoring
- Rotate the camera’s image for vertical video work
- Check focus
- Check exposure
- Check color
- Use LUTs
- Import LUTs
- Find LUTs
-
Launch FieldMonitor from another app
- Get Help or report a problem
Connect FieldMonitor to a source
Tip: turn Airplane Mode on, then turn Wi-Fi back on. You'll improve display performance and battery life and reduce interruptions from calls, messages, and notifications.
Direct connects your iDevice to the source’s Wi-Fi radio directly. It‘s easy, but camera radios are weak and limited in range and performance. All sources allow direct connection.
Via Network uses a separate Wi-Fi access point or router: you connect your source and your iDevice to the access point. Via Network allows greater range because the access point’s radios are more powerful, but you need to bring the access point on location and provide power to it. You can operate several sources on the same network and switch between them without having to change theß network on your iDevice. Only Canons, Panasonics, “PC Remote” Sonys, and Teradeks connect via network.
- Canon cameras, direct
- Canon cameras, via network
-
Fujifilm cameras, direct
-
Panasonic cameras, direct
- Panasonic cameras, via network
-
Sony "Smart Remote" cameras, direct
-
Sony “Ctrl w/ Smartphone” cameras, direct
-
Sony “Smartphone Connect” cameras, direct
-
Sony “Smartphone Connection” cameras, direct
-
Sony “PC Remote” cameras, direct or via network
-
Teradek H.264 / HEVC transmitters, direct or via network
Canon cameras, direct connection
Before connecting FieldMonitor to a Canon, check three settings in the camera’s SHOOT menu:
-
Metering timer sets the length of time the camera’s exposure meter runs after pressing the camera’s shutter button or tapping AF or METER in FieldMonitor. When the meter is active, you’ll see “floating” values change with the light, for example the aperture value in shutter-priority mode. When the meter tuns off, floating value displays either disappear or revert to their fixed values (AUTO ISO, for example, or the preset value for exposure compensation when exposure compensation is adjustable).
- Image review (photo modes only) sets the camera’s photo review time. If you have FieldMonitor’s Photo Review Time turned on, the camera’s Image Review should be off, or set to a short time like 2 sec.: the camera’s live-view image will remain frozen for that time, even if FieldMonitor’s review finishes earlier. You can unfreeze the image by tapping the AF or METER button, but it’s easier to work if the camera’s image doesn’t freeze. (FieldMonitor’s photo review is usually better than the camera’s photo review as the camera’s frozen live-view image doesn't exactly match the captured photo. Use the camera’s photo review only if you’re primarily working with the camera’s monitor and use that display for reviewing photos instead of FieldMonitor.)
- Expo. simulation (photo modes only) determines whether the live-view image simulates the exposure you’ll get when you take a picture. If you use FieldMonitor’s ‘scopes or false color to adjust still-photo exposure, make sure that Expo. simulation is set to Enable, otherwise what you see in live view will not be what you get in your photos.
Canons manage connections to different apps and/or devices individually. On some cameras, each connection is a “set”; on others you “register a device for connection” or “add a device to connect to” when you first connect a remote app to the camera. If you use FieldMonitor running on two different iDevices at different times, that’s two different connections. If you run Canon Camera Connect and FieldMonitor on the same iDevice at different times, that also counts as two connections. To keep track of the different connections, give each copy of FieldMonitor its own name, for example “FieldMonitor-SE” for a copy of FieldMonitor on an iPhone SE, and “FieldMonitor-Air” for FieldMonitor on an iPad Air. Some Canons will use these names automatically when a new connection is registered; with others, you'll need to manually edit a “set” name to identify it properly. Some cameras can only remember three sets of connections; if you need more, you will need to re-use a set or sets.
If you try to connect to a Canon using a different connection setting (for example, the setting used for Canon's Camera Connect app, or for FieldMonitor running on a different iDevice), FieldMonitor may say “Camera refused connection.” You must set up different connections for different apps, and for different iDevices. If FieldMonitor says “Press OK on the camera to allow FieldMonitor to connect”, but your camera is not showing a “Connect to this smartphone” screen with an OK button to press, your camera is expecting a different connection. Either change the connection on the camera to the one set up / registered for FieldMonitor, or configure a new set / register a new connection for FieldMonitor.
Different Canons have different ways of setting up connections. Here are instructions for the R6 Mark II, the RP, and the 80D — if you have one of these, you’re all set! Otherwise, use these as examples for the way your camera may connect. See your camera's User Guide or Wireless Function Instruction Manual and look for the “Connecting to a Smartphone” instructions using a direct Wi-Fi connection (not using Bluetooth), and run FieldMonitor instead of Canon’s Camera Connect app.
Direct connection on the EOS R6 Mark II
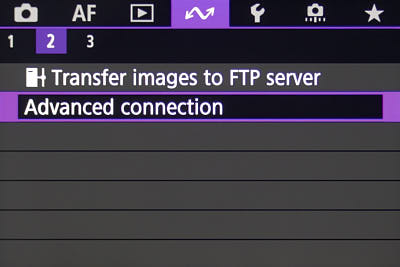
On your camera, press the MENU button, and navigate sideways to the connection menu page 2 showing Advanced connection (wireless menu page 1 with Connect to smartphone will not work!):
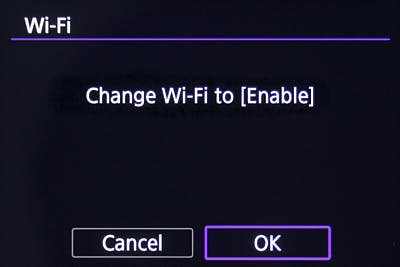
If the camera’s Wi-Fi is off, you’ll see this screen; press OK to enable Wi-Fi:
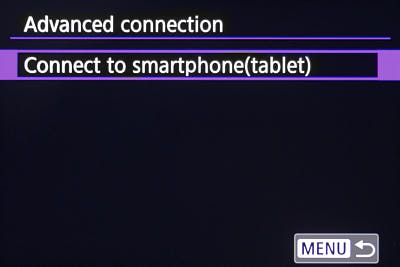
Press OK to Connect to smartphone(tablet):
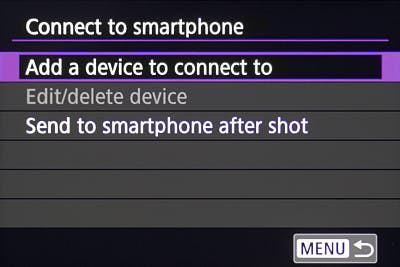
The first time you connect to a new iDevice, select Add a device to connect to (once you have connected once, it will aapear in a list here for quick reconnection):
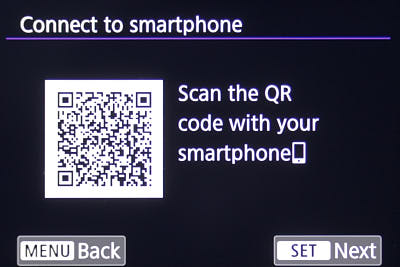
The camera shows a QR code: ignore it! Just press the SET button:
The camera will look for Wi-Fi access points:
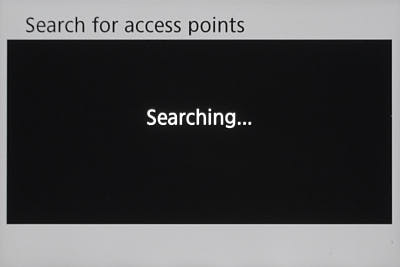
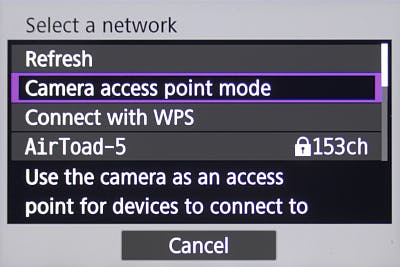
If the camera hasn't connected to a network before, it wil proceed to the Select a network screen (below). If the camera finds a network it previously connected to, it will display its name briefly before connecting to it. To prevent that, press the INFO button quickly, to bring up the Select a network screen.
On the Select a network screen, choose Camera access point mode:
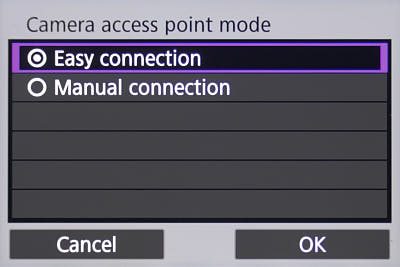
Choose Easy connection and press OK:
The camera displays connection info:
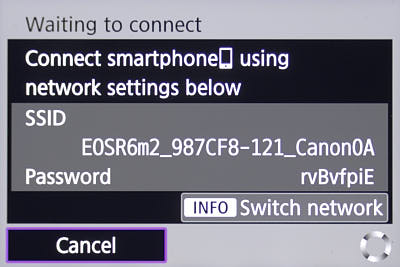
Use the Scanner to connect to the camera (iOS 15+; not available on Mac), or connect manually.
- Tap Scan to open the Scanner. You can pinch the image to zoom in or out.
- Aim the scanner at the camera’s screen. Frame it on the SSID and encryption key and hold it steady; the iDevice needs to be able to read the text clearly. iOS will ask you to join the network; if you agree, your iDevice will switch to the camera’s network and connect automatically. Connection takes a few seconds; then your camera should appear in the Source list.
- A Canon’s SSID must end in “_Canon0A” to be recognized.
- If you see “Unable to connect”:
-
- Try again: connection doesn’t always work the first time.
- Sometimes text recognition may confuse 0 and O, 1 and I, or 8 and B, and you won’t be able to connect successfully. If you see “Unable to connect” repeatedly, go into Settings > Wi-Fi and choose the camera’s network manually.
To connect manually: In your iDevice’s Wi-Fi settings, log into the camera’s network with the password shown.
When your iDevice connects to the camera, the camera will show this screen:
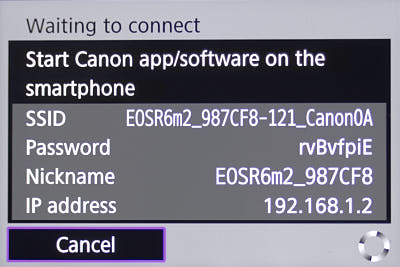
Open FieldMonitor (not Camera Connect!).
Your camera should appear in the Source List. If not, tap Refresh. When the camera appears, tap it:
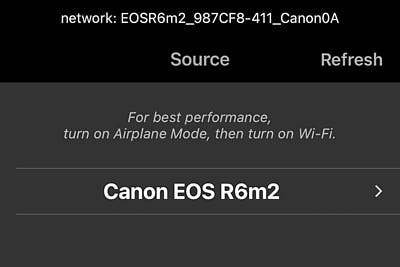
If FieldMonitor shows this...
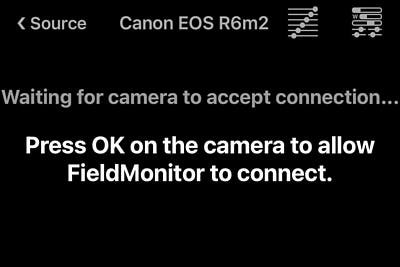
...your camera should show this:
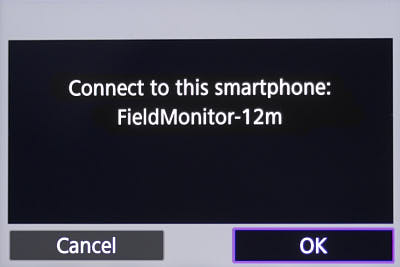
Tap OK to approve the connection.
You should now be able to monitor and control your camera.
The next time you connect, you’ll see this after selecting Connect to smartphone(tablet):
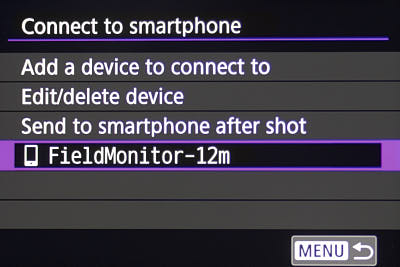
Any previous connection will be shown in the list. Just select the correct one, and the connection will be made.
Direct connection on the EOS RP
On your camera, press the MENU button, and navigate sideways to the settings menu showing Wireless communication settings:

Select Wi-Fi function:

You will see this “connection type” screen if this is the first time you have registered a device:

If you already have devices / apps registered, you'll see a screen showing your existing connections:

Choosing one of these will set up the camera for that connection. To register a new connection (as you need to do the first time you run FieldMonitor), select the right arrow or press the right side of the 4-way controller to get to the connection type screen.
Choose Connect to smartphone:

Select Register a device for connection:

Select Do not display:

The camera will display the network SSID and password:

Use the Scanner to connect to the camera (iOS 15+; not available on Mac), or connect manually.
- Tap Scan to open the Scanner. You can pinch the image to zoom in or out.
- Aim the scanner at the camera’s screen. Frame it on the SSID and password (if any) and hold it steady; the iDevice needs to be able to read the text clearly. iOS will ask you to join the network; if you agree, your iDevice will switch to the camera’s network and connect automatically. Connection takes a few seconds; then your camera should appear in the Source list.
- A Canon’s SSID must end in “_Canon0A” to be recognized.
- If you see “Unable to connect”:
-
- Try again: connection doesn’t always work the first time.
- Sometimes text recognition may confuse 0 and O, 1 and I, or 8 and B, and you won’t be able to connect successfully. If you see “Unable to connect” repeatedly, go into Settings > Wi-Fi and choose the camera’s network manually.
To connect manually: In your iDevice’s Wi-Fi settings, log into that network, using that password:

When your iDevice connects to the camera, the camera will show this screen:

Open FieldMonitor (not Camera Connect!).
Your camera should appear in the Source list. If not, tap Refresh. When the camera appears, tap it:

The Monitor window opens, and this message appears:

On the camera, confirm the connection by selecting OK:

The camera will allow FieldMonitor to connect, and the live-view image should appear.
The next time you wish to connect, follow the first two steps to turn on Wi-Fi. Your connection should appear in the camera’s list automatically. Select it, connect to the camera's network, open FieldMonitor, and start working.
- If, when you start FieldMonitor, it says “Camera refused connection”, it means your camera is expecting a different connection. Either change the connection set on the camera to the one set up for FieldMonitor, or register a new connection for FieldMonitor.
- If FieldMonitor says “Press OK on the camera to allow FieldMonitor to connect”, but your camera is not showing the “Connect to this smartphone” screen, your camera is expecting a different connection. Either change the connection set on the camera to the one set up for FieldMonitor, or register a new connection for FieldMonitor.
Direct connection on the EOS 80D
On your camera, press the MENU button, and navigate sideways to the SET UP menu showing Wireless communication settings:

Select Wireless communication settings, and make sure Wi-Fi is enabled:

Then select Wi-Fi function...

...and Connect to smartphone:

Select Easy connection:

The camera will display the camera’s SSID and encryption key:

Use the Scanner to connect to the camera (iOS 15+; not available on Mac), or connect manually.
- Tap Scan to open the Scanner. You can pinch the image to zoom in or out.
- Aim the scanner at the camera’s screen. Frame it on the SSID and encryption key and hold it steady; the iDevice needs to be able to read the text clearly. iOS will ask you to join the network; if you agree, your iDevice will switch to the camera’s network and connect automatically. Connection takes a few seconds; then your camera should appear in the Source list.
- A Canon’s SSID must end in “_Canon0A” to be recognized.
- If you see “Unable to connect”:
-
- Try again: connection doesn’t always work the first time.
- Sometimes text recognition may confuse 0 and O, 1 and I, or 8 and B, and you won’t be able to connect successfully. If you see “Unable to connect” repeatedly, go into Settings > Wi-Fi and choose the camera’s network manually.
To connect manually: In your iDevice’s Wi-Fi settings, log into that network, using the encryption key as the password:

When your iDevice connects to the camera, the camera will show this screen:

Open FieldMonitor (not Camera Connect!).
Your camera should appear in the Source list. If not, tap Refresh. When the camera appears, tap it:

The Monitor window opens, and this message appears:

On the camera, confirm the connection by selecting OK:

The camera will allow FieldMonitor to connect, and the live-view image should appear.
The next time you wish to connect, you just need to make sure the camera’s Wi-Fi is turned on (on the 80D, it's on by default until you turn it off). Connect to the camera's network, open FieldMonitor, and start working. If Wi-Fi is off, when you choose Connect to smartphone, you'll get a screen that lets you choose, change, or delete settings; choose the setting that corresponds to FieldMonitor and press Connect to start the camera’s network.
Connection “sets” on the 80D are labeled SET1, SET2, and SET3 by default. Rename them to make picking the correct set easier. For example, I renamed SET1 on my 80D as “FM-SE”, as that’s the set that FieldMonitor-SE connects with.
- If, when you start FieldMonitor, it says “Camera refused connection”, it means your camera is expecting a different connection. Either change the set on the camera to the one set up for FieldMonitor, or configure a new set for FieldMonitor.
- If FieldMonitor says “Press OK on the camera to allow FieldMonitor to connect”, but your camera is not showing the “Connect to this smartphone” screen, your camera is expecting a different connection. Either change the set on the camera to the one set up for FieldMonitor, or configure a new set for FieldMonitor.
Canon cameras, via Network
Before connecting FieldMonitor to a Canon, check three settings in the camera’s SHOOT menu:
-
Metering timer sets the length of time the camera’s exposure meter runs after pressing the camera’s shutter button or tapping AF or METER in FieldMonitor. When the meter is active, you’ll see “floating” values change with the light, for example the aperture value in shutter-priority mode. When the meter tuns off, floating value displays either disappear or revert to their fixed values (AUTO ISO, for example, or the preset value for exposure compensation when exposure compensation is adjustable).
- Image review (photo modes only) sets the camera’s photo review time. If you have FieldMonitor’s Photo Review Time turned on, the camera’s Image Review should be off, or set to a short time like 2 sec.: the camera’s live-view image will remain frozen for that time, even if FieldMonitor’s review finishes earlier. You can unfreeze the image by tapping the AF or METER button, but it’s easier to work if the camera’s image doesn’t freeze. (FieldMonitor’s photo review is usually better than the camera’s photo review as the camera’s frozen live-view image doesn't exactly match the captured photo. Use the camera’s photo review only if you’re primarily working with the camera’s monitor and use that display for reviewing photos instead of FieldMonitor.)
- Expo. simulation (photo modes only) determines whether the live-view image simulates the exposure you’ll get when you take a picture. If you use FieldMonitor’s ‘scopes or false color to adjust still-photo exposure, make sure that Expo. simulation is set to Enable, otherwise what you see in live view will not be what you get in your photos.
Canons manage connections to different apps and/or devices individually. On some cameras, each connection is a ”set”; on others you “register a device for connection” or “add a device to connect to” when you first connect a remote app to the camera. If you use FieldMonitor running on two different iDevices at different times, that’s two different connections. If you run Canon Camera Connect and FieldMonitor on the same iDevice at different times, that also counts as two connections.To keep track of the different connections, give each copy of FieldMonitor its own name, for example “FieldMonitor-SE” for a copy of FieldMonitor on an iPhone SE, and “FieldMonitor-Air” for FieldMonitor on an iPad Air. Some Canons will use these names automatically when a new connection is registered; with others, you'll need to manually edit a “set” name to identify it properly. A camera can only remember three sets of connections; if you need more, you will need to re-use a set or sets.
If you try to connect to a Canon using a different connection setting (for example, the setting used for Canon's Camera Connect app, or for FieldMonitor running on a different iDevice), FieldMonitor will say “Camera refused connection.” You must set up different connections for different apps, and for different iDevices. If FieldMonitor says “Press OK on the camera to allow FieldMonitor to connect”, but your camera is not showing a “Connect to this smartphone” screen with an OK button to press, your camera is expecting a different connection. Either change the connection on the camera to the one set up / registered for FieldMonitor, or configure a new set / register a new connection for FieldMonitor.
Different Canons have different ways of setting up connections. Here are instructions for the R6 Mark II, the RP, and the 80D — if you have one of these, you’re all set! Otherwise, use these as examples for the way your camera may connect. See your camera's User Guide or Wireless Function Instruction Manual and look for the “Connecting to a Smartphone” instructions using a direct Wi-Fi connection (not using Bluetooth), and run FieldMonitor instead of Canon’s Camera Connect app.
Via Network connection on the EOS R6 Mark II
On your camera, press the MENU button, and navigate sideways to the connection menu page 2 showing Advanced connection (wireless menu page 1 with Connect to smartphone will not work!):

If the camera’s Wi-Fi is off, you’ll see this screen; press OK to enable Wi-Fi:

Press OK to Connect to smartphone(tablet):

The first time you connect to a new iDevice, select Add a device to connect to (once you have connected once, it will aapear in a list here for quick reconnection):

The camera shows a QR code: ignore it! Just press the SET button:

The camera will look for Wi-Fi access points:

If the camera hasn't connected to a network before, it wil proceed to the Select a network screen (below). If the camera finds a network it previously connected to, it will display its name briefly before connecting to it. It that’s not the network you want to use, press the INFO button quickly, to bring up the Select a network screen.
On the Select a network screen, choose the network you want to use:
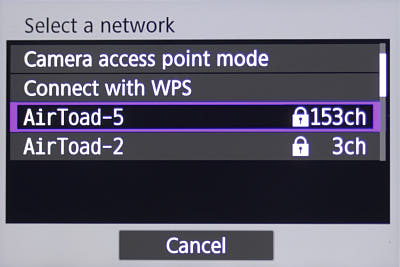
If your network has a password, enter your password and press OK:
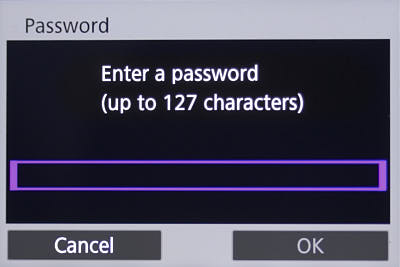
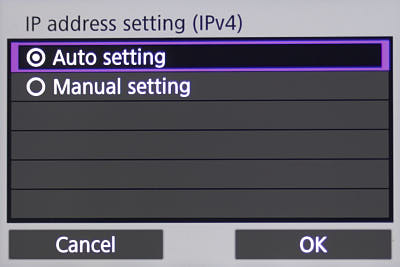
For IP adress setting, choose Auto setting:
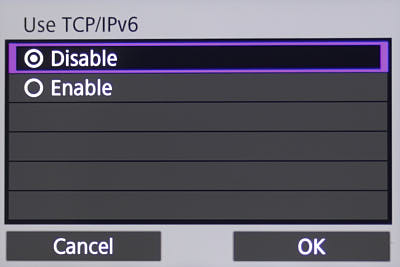
Disable TCP/IPv6:
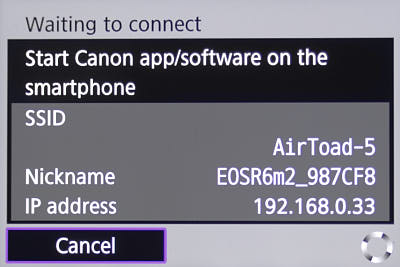
The camera will ask you to start your app:
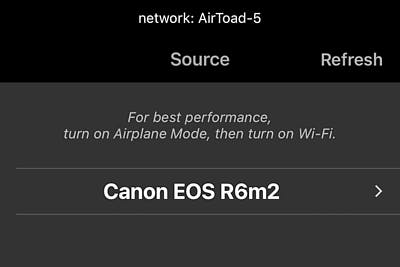
Make sure your iDevice is connected to the same network as the camera. In FieldMonitor, the camera should now appear in the Source list (if you don’t see it, tap Refresh). Tap on the camera’s name to monitor it:
If FieldMonitor shows this...

...your camera should show this:

Tap OK to approve the connection.
You should now be able to monitor and control your camera.
The next time you connect, you’ll see this after selecting Connect to smartphone(tablet):

Any previous connection will be shown in the list. Just select the correct one, and the connection will be made.
Via Network connection on the the EOS RP.
On your camera, press the MENU button, and navigate sideways to the settings menu showing Wireless communication settings:

Select Wi-Fi function:

You will see this “connection type” screen if this is the first time you have registered a device:

If you already have devices / apps registered, you'll see a screen showing your existing connections:

Choosing one of these will set up the camera for that connection. To register a new connection (as you need to do the first time you run FieldMonitor), select the right arrow or press the right side of the 4-way controller to get to the connection type screen.
Choose Connect to smartphone:

Select Register a device for connection:

Select Do not display:

The camera will display the camera’s SSID and password; choose Switch network:

Select the network you want to use, and log into it:

After connecting to the network (you may need to enter a password), choose Auto setting for the IP address:

The camera will show this screen:

Connect your iDevice to the same network, and open FieldMonitor (not Camera Connect!). Your camera should appear in the Source list. If not, tap Refresh. When the camera appears, tap it:

The Monitor window opens, and this message appears:

On the camera, confirm the connection by selecting OK:

The camera will allow FieldMonitor to connect, and the live-view image should appear.
The next time you wish to connect, follow the first two steps to turn on Wi-Fi. Your connection should appear in the camera’s list automatically. Select it, connect to the camera's network, open FieldMonitor, and start working.
- If, when you start FieldMonitor, it says “Camera refused connection”, your camera is expecting a different connection. Either change the connection set on the camera to the one set up for FieldMonitor, or register a new connection for FieldMonitor.
- If FieldMonitor says “Press OK on the camera to allow FieldMonitor to connect”, but your camera is not showing the “Connect to this smartphone” screen, your camera is expecting a different connection. Either change the connection set on the camera to the one set up for FieldMonitor, or register a new connection for FieldMonitor.
Via Network connection on the EOS 80D
On your camera, press the MENU button, and navigate sideways to the settings menu showing Wireless communication settings:

Select Wireless communication settings, and make sure Wi-Fi is enabled:

Then select Wi-Fi function...

and Connect to smartphone:

Choose Select a network and press OK:

Select your network from the list (or connect with WPS if your network has that option):

After connecting to the network (you may need to enter a password), choose Auto setting for the IP address:

The camera will show this screen:

On your iDevice’s Wi-Fi settings, log into the same network and open FieldMonitor (not Camera Connect!). Your camera should appear in the Source list. If not, tap Refresh. When the camera appears, tap it:

The Monitor window opens, and this message appears:

On the camera, confirm the connection by selecting OK:

The camera will allow FieldMonitor to connect, and the live-view image should appear.
The next time you wish to connect, you just need to make sure the camera’s Wi-Fi is turned on (on the 80D, it's on by default until you turn it off). Connect to the network, open FieldMonitor, and start working. If Wi-Fi is off, when you choose Connect to smartphone, you'll get a screen that lets you choose, change, or delete settings; choose the setting that corresponds to FieldMonitor and press Connect to start the camera’s network.
Connection “sets” on the 80D are labeled SET1, SET2, and SET3 by default. Rename them to make picking the correct set easier. For example, I renamed SET1 on my 80D as “FM-SE”, as that’s the set that FieldMonitor-SE connects with.
- If, when you start FieldMonitor, it says “Camera refused connection”, it means your camera is expecting a different connection. Either change the set on the camera to the one set up for FieldMonitor, or configure a new set for FieldMonitor.
- If FieldMonitor says “Press OK on the camera to allow FieldMonitor to connect”, but your camera is not showing the “Connect to this smartphone” screen, your camera is expecting a different connection. Either change the set on the camera to the one set up for FieldMonitor, or configure a new set for FieldMonitor.
Fujifilm cameras
Fujifilm cameras go completely dead when under Wi-Fi control, so adjust any menu or dial settings before starting Wi-Fi. These include still photo and movie formats; film simulation, F-Log, and HLG settings; and image quality adjustments. Once FieldMonitor connects to the camera, you will be able to switch between photo and video modes, adjust exposure and white balance controls, and set AF points in photo mode only using in-app controls, but no on-camera controls will work.
On your camera, press MENU/OK and find WIRELESS COMMUNICATION (usually towards the bottom of the SHOOTING submenu):

Select it. The WIRELESS COMMUNICATION screen will appear. If the camera was previously connected to a Wi-Fi controller, such as Fujifilm Camera Remote, the screen will look something like this:
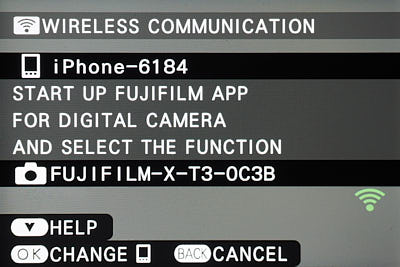
Important: if you last controlled the camera using a different app or a different iDevice, press (OK)CHANGE (the MENU/OK button) to make the camera forget the last controller. If you don’t do this, the camera will not appear in FieldMonitor’s source list.
(If you wait to do this until after you have connected to the camera’s network and started FieldMonitor, tap FieldMonitor’s Refresh button to try talking to the camera again.)
Here's the WIRELESS COMMUNICATION screen when the camera isn't expecting a previous controller:

Use the Scanner to connect to the camera (iOS 15+; not available on Mac), or connect manually.
- Tap Scan to open the Scanner. You can pinch the image to zoom in or out.
- Aim the scanner at the camera’s screen. Frame it on the SSID (FUJIFILM-X-xxx) and hold it steady; the iDevice needs to be able to read the text clearly. iOS will ask you to join the network; if you agree, your iDevice will switch to the camera’s network and connect automatically. Connection takes a few seconds; then your camera should appear in the Source list.
- If you see “Unable to connect”:
-
- Try again: connection doesn’t always work the first time.
- Sometimes text recognition may confuse 0 and O, 1 and I, or 8 and B, and you won’t be able to connect successfully. If you see “Unable to connect” repeatedly, go into Settings > Wi-Fi and choose the camera’s network manually.
To connect manually: On your iDevice, go to Settings > Wi-Fi and connect to the camera’s network:
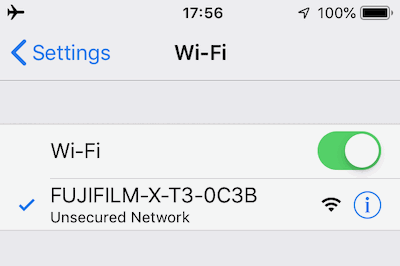
Close Settings and open FieldMonitor.
The camera should appear in the Source list. It may up to five seconds to appear; if it takes longer, tap Refresh.
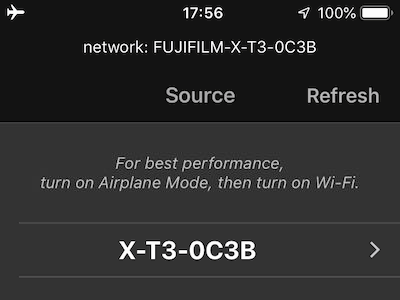
If the camera doesn’t appear after five seconds, see if the camera’s WIRELESS CONNECTION screen has an (OK)CHANGE option:

If so, press the MENU/OK button on the camera, then tap Refresh in FieldMonitor.
After your iDevice talks to the camera, you may see a screen like this on the camera:
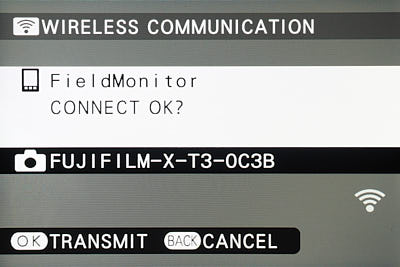
Press (OK)TRANSMIT (MENU/OK button) on the camera to allow FieldMonitor to connect.
Once FieldMonitor connects to the camera and it appears in the Source list, the camera’s status LED flashes yellow and green, its display turns off, and no controls on the camera will function — you must perform all camera control using the app.
Tap the camera in FieldMonitor's Source list to open the Monitor screen so you can view and control the camera.
Do not turn off your iDevice while you are controlling the camera remotely. Turning off the iDevice or interrupting its Wi-Fi connection causes the camera to shut down. If you switch to a different app and that app consumes a lot of resources, iOS may terminate FieldMonitor in the background, and cause the camera to shut down. If the camera shuts down, restart the camera by turning its power switch off, then on again.
Panasonic cameras, direct connection
Connect your iDevice directly to the camera, using the camera’s own Wi-Fi network. This is the simplest connection method and it often works well, though “via network” connections can offer greater range and better interference rejection using a high-performance access point.
GH5 menus are shown; other Panasonics are similar.
Press MENU/SET, and go to the Setup (wrench) menu:
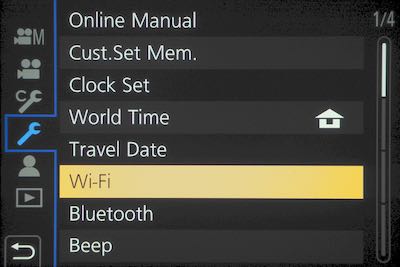
Select Wi-Fi:

Select Wi-Fi Function:
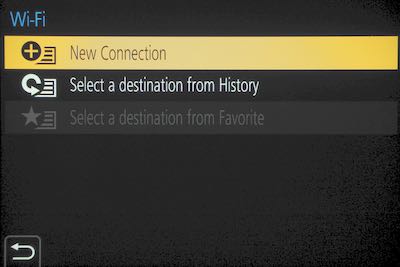
Select New Connection:

Select Remote Shooting & View. If your camera does not have a Wi-Fi password, you'll see a screen like this:
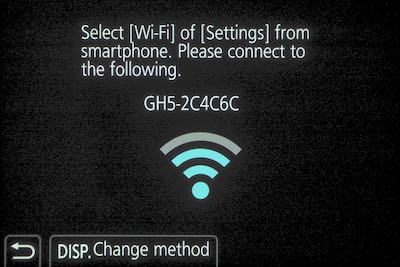
If your camera uses a Wi-Fi password, you'll see a screen like this (from a GH4):

Use the Scanner to connect to the camera (iOS 11+; not available on Mac), or connect manually.
- Tap Scan to open the Scanner. You can pinch the image to zoom in or out.
- Aim the scanner at the camera’s QR code. iOS will ask you to join the network; if you agree, your iDevice will switch to the camera’s network and connect automatically. Connection takes a few seconds; then your camera should appear in the Source list.
- If you see “Unable to connect”:
-
- Try again: connection doesn’t always work the first time. If you see “Unable to connect” repeatedly, go into Settings > Wi-Fi and choose the camera’s network manually; its password should already be known from the QR scan.
- If you repeatedly see “Unable to connect”, you may have a “profile” installed by the camera manufacturer’s app to join this network (Settings > General > Profiles). You can delete the profile and have FieldMonitor make the connection, or keep the profile and switch to the camera’s Wi-Fi manually. If you delete the profile and connect using FieldMonitor, iOS will remember the network the same way it does when using the profile.
To connect manually: on your iDevice, go to Settings > Wi-Fi and connect to the camera’s network (enter the camera’s network password if needed):

Once your iDevice connects, you'll see a screen like this on the camera:

On your iDevice, open FieldMonitor.
The network shown at the top of the screen should match the camera’s SSID or network name, and your camera should appear in the Source list:

If the camera’s name isn't shown in the list, tap Refresh. It should appear.
Tap the camera’s name to start monitoring it.
Panasonic cameras, via network
Connect your iDevice and your camera to a separate access point. When you connect using a good access point with beam-forming and advanced interference rejection, your connection will be more stable and work over longer distances than a “direct” connection.
GH5 menus are shown; other Panasonics are similar.
Press MENU/SET, and go to the Setup (wrench) menu:

Select Wi-Fi:

Select Wi-Fi Function:

Select New Connection:

Select Remote Shooting & View. You'll see a screen like this...

...or like this:

Press DISP. on the back of the camera:

Select Via Network:

You can use WPS if your access point offers it; otherwise select From List. The camera will scan the airwaves and show you available networks (access points):

Choose your access point. If your network uses a password, you'll need to enter it on the camera the first time you connect (the camera remembers it for later connections). When the camera connects, you'll see a screen like this:

On your iDevice, open the Settings app and go to the Wi-Fi section. Connect to the same network:

Open FieldMonitor. The camera should appear in FieldMonitor’s list:

If the camera’s name isn't shown in the list, tap Refresh. It should appear.
Tap the camera’s name to start monitoring it.
Once you have connected this way once, you can choose “Select a destination from History” in the camera’s Wi-Fi menu the next time you connect, and choose the same network again.
Sony “Smart Remote” cameras
“Smart Remote” cameras include the A6300, A6500, A7ii, A7Rii, A7S, A7Sii, and similar cameras.
A6300 screens are shown, with “Smart Remote Control” installed on the camera. Other Smart Remote cameras are similar. If your camera’s menus don't look like this, but the main category icons are still on the top of the menu, you probably have a Ctrl w/ Smartphone camera. If the main icons run down the side of the menu, it’s a Smartphone Connect or Smartphone Connection camera.
Do not select “Send to Smartphone” or “Send to Computer” in the camera’s menus. These functions are only used to transfer images; they do not allow remote control.
Press MENU and select the applications tab:

Select Application List:

Select Smart Remote Control (or Smart Remote Embedded if you haven't installed Smart Remote Control. You need to install the free “Smart Remote Control” from the PlayMemories Camera Apps Store for the camera to be fully controllable. With only “Smart Remote Embedded’ installed, you can only adjust exposure compensation. ). Wi-Fi will start up...

...and then you'll see this screen:

Use the Scanner to connect to the camera (iOS 11+; not available on Mac), or connect manually.
- Tap Scan to open the Scanner. You can pinch the image to zoom in or out.
- Aim the scanner at the camera’s QR code. iOS will ask you to join the network; if you agree, your iDevice will switch to the camera’s network and connect automatically. Connection takes a few seconds; then your camera should appear in the Source list.
- If you see “Unable to connect”:
-
- Try again: connection doesn’t always work the first time. If you see “Unable to connect” repeatedly, go into Settings > Wi-Fi and choose the camera’s network manually; its password should already be known from the QR scan.
- If you repeatedly see “Unable to connect”, you may have a “profile” installed by the Sony app to join this network (Settings > General > Profiles). You can delete the profile and have FieldMonitor make the connection, or keep the profile and switch to the camera’s Wi-Fi manually. If you delete the profile and connect using FieldMonitor, iOS will remember the network the same way it does when using the profile.
To connect manually, press the trashcan button to show the password screen:

On your iDevice, go to Settings > Wi-Fi and choose the camera's network. The first time you connect, you'll need to enter the password shown on the camera’s password screen (your iDevice remembers that password for the next time you connect to the camera).

Once your iDevice connects, open FieldMonitor.
The network shown at the top of the screen should match the camera’s SSID or network name, and your camera should appear in the Source list.

If the camera’s name isn't shown in the list, tap Refresh. It should appear.
Tap the camera’s name to start monitoring it.
Sony “Ctrl w/ Smartphone” cameras
“Ctrl w/ Smartphone” cameras include the A7iii, A7Riii, A99ii, and similar cameras.
A7Riii screens are shown; other cameras’ menus are similar. If your camera’s menus don't look like this, but the main category icons are still on the top of the menu, you probably have a Smart Remote camera. If the main icons run down the side of the menu, it may still be a Ctrl w/ Smartphone camera, but it might be a Smartphone Connect or Smartphone Connection camera instead.
Do not select “Send to Smartphone” or “Send to Computer” in the camera’s menus. These functions are only used to transfer images; they do not allow remote control.
Press MENU and select the Network or Wireless tab with Ctrl w/ Smartphone in it:

Select Ctrl w/ Smartphone:

Turn Ctrl w/ Smartphone On,

Select Connection:

The camera will start up its network...

...and you’ll see this screen:

Use the Scanner to connect to the camera (iOS 11+; not available on Mac), or connect manually.
- Tap Scan to open the Scanner. You can pinch the image to zoom in or out.
- Aim the scanner at the camera’s QR code. iOS will ask you to join the network; if you agree, your iDevice will switch to the camera’s network and connect automatically. Connection takes a few seconds; then your camera should appear in the Source list.
- If you see “Unable to connect”:
-
- Try again: connection doesn’t always work the first time. If you see “Unable to connect” repeatedly, go into Settings > Wi-Fi and choose the camera’s network manually; its password should already be known from the QR scan.
- If you repeatedly see “Unable to connect”, you may have a “profile” installed by the Sony app to join this network (Settings > General > Profiles). You can delete the profile and have FieldMonitor make the connection, or keep the profile and switch to the camera’s Wi-Fi manually. If you delete the profile and connect using FieldMonitor, iOS will remember the network the same way it does when using the profile.
To connect manually, press the trashcan button to show the password screen:

On your iDevice, go to Settings > Wi-Fi and choose the camera's SSID (network name). The first time you connect, you'll need to enter the password shown on the camera’s password screen (your iDevice remembers that password for the next time you connect to the camera).

Once your iDevice connects, open FieldMonitor.
The network shown at the top of the screen should match the camera’s SSID or network name, and your camera should appear in the Source list. (Note: some cameras, including the A1, A7Riv, A7Siii, and FX3, may appear briefly, then disappear and reappear with a * at the end its name. Connection will only work with these cameras when its name has the * on it.)

If the camera’s name isn't shown in the list, tap Refresh. It should appear.
Tap the camera’s name to start monitoring it.
Tip: turn on Always Connected:

The camera’s battery will drain slightly faster, but you’ll be able to connect to the camera’s network without having to go through all these steps: just select the camera’s network on your iDevice and open FieldMonitor.
Sony “Smartphone Connect” cameras
“Smartphone Connect” cameras include the A7Riii and A7Siii. They work with the Imaging Edge Mobile remote control app.
A7iv screens are shown. If your camera’s menus don't look like this, but the main category icons still run down the side of the menu, you probably have a Ctrl w/ Smartphone, Smartphone Connect, or a Smartphone Connection camera. If the main icons are on the top of the menus, you have a Smart Remote or Ctrl w/ Smartphone camera.
Press MENU and select the Network submenu::

Select Smartphone Connect:

Choose Smartphone Regist.:

Select Register Smartphone:

Then choose Connect via Wi-Fi:

Wi-Fi will start up, and you’ll see this screen:

Use the Scanner to connect to the camera (iOS 15+; not available on Mac), or connect manually.
- Tap Scan to open the Scanner. You can pinch the image to zoom in or out.
- Aim the scanner at the camera’s SSID and Password (be sure to include the word “SSID”). iOS will ask you to join the network; if you agree, your iDevice will switch to the camera’s network and connect automatically. Connection takes a few seconds; then your camera should appear in the Source list.
- If you see “Unable to join network”, check the SSID‘s spelling. Some Sony SSIDs use lowercase letters that FieldMonitor sees as uppercase; for example “DIRECT-DxU1” might be seen as “DIRECT-DXU1”. If this happens consistently, try resetting the SSID: Network > Wi-Fi > SSID/PW Reset. Repeat until the SSID is something that FieldMonitor sees correctly.
- If you see “Unable to connect”:
-
- Try again: connection doesn’t always work the first time. If you see “Unable to connect” repeatedly, go into Settings > Wi-Fi and choose the camera’s network manually; its password should already be known from the QR scan.
- If you repeatedly see “Unable to connect”, you may have a “profile” installed by the Sony app to join this network (Settings > General > Profiles). You can delete the profile and have FieldMonitor make the connection, or keep the profile and switch to the camera’s Wi-Fi manually. If you delete the profile and connect using FieldMonitor, iOS will remember the network the same way it does when using the profile.
To connect manually, on your iDevice, go to Settings > Wi-Fi and choose the camera's SSID (network name). The first time you connect, you'll need to enter the password shown on the camera’s password screen (your iDevice remembers that password for the next time you connect to the camera).

Once your iDevice connects, open FieldMonitor.
The network shown at the top of the screen should match the camera’s SSID or network name, and your camera should appear in the Source list. (Note: some cameras may appear briefly, then disappear and reappear with a * at the end its name. Connection will only work with these cameras when its name has the * on it.)

If the camera’s name isn't shown in the list, tap Refresh. It should appear.
Tap the camera’s name to start monitoring it.
Sony “Smartphone Connection” cameras
“Smartphone Connection” cameras include the A7Rv, Fx3, FX30, and ZV series, all with current firmware. They work with the Creator’s App remote control app, not the Imaging Edge Mobile app.
A7v firmware version 2.00 screens are shown. If your camera’s menus don't look like this, but your camera uses Creator’s App, look for similar menu selections. If your camera works with Imaging Edge Mobile, you have a Ctrl w/ Smartphone, Smartphone Connect, Smartphone Connection, or Smart Remotecamera.
Before using FieldMonitor, turn Access Authentication off. If you don't do this, FieldMonitor will display “Press OK on the camera to allow FieldMonitor Pairing” when you try to connect, but the camera won’t offer an OK button. To disable Access Authentication, press MENU and select the Network submenu, then select Network Option:
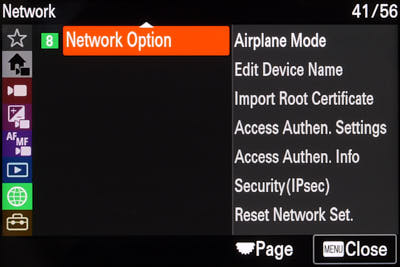
Then select Access Authen. Settings:
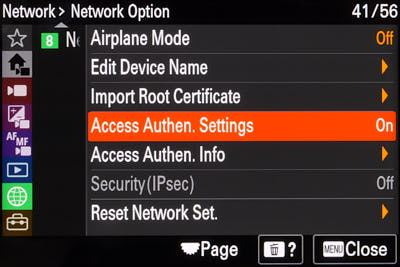
Choose Access Authen. ...
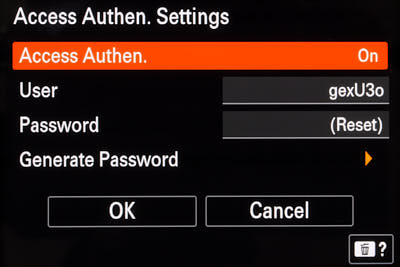
... and turn it Off:
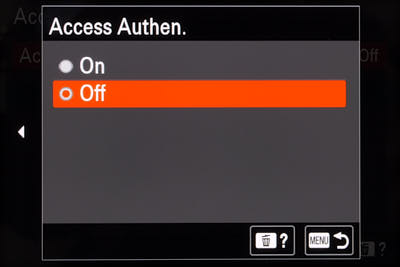
You only need to do this once.
To connect, press MENU and select the Network submenu, then select Cnct./PC Remote or Cnct./Remote Sht.:
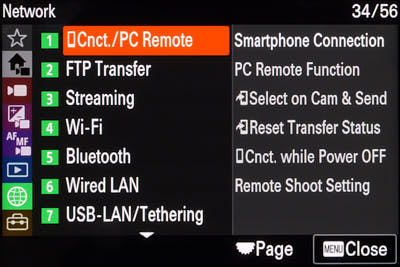
Choose Smartphone Connection:
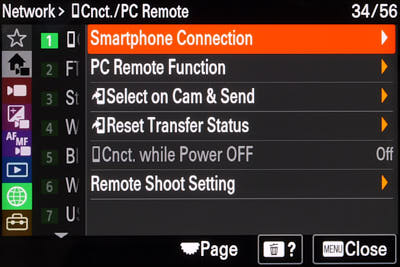
Choose Connect a smartphone:
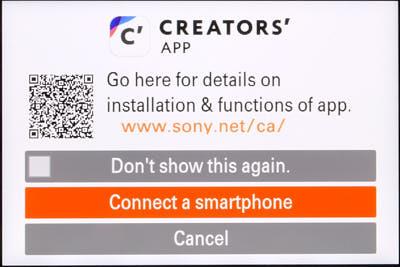
Then choose Connect via Wi-Fi (not OK or Cancel!):
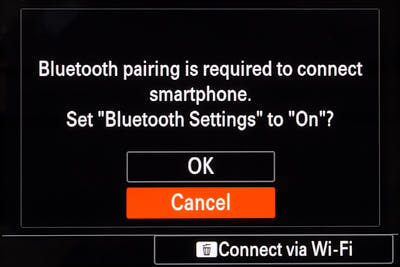
The camera displays its connection info:
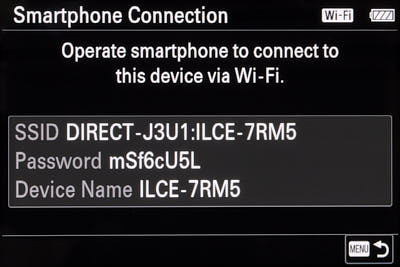
Use the Scanner to connect to the camera (iOS 11+; not available on Mac), or connect manually.
- Tap Scan to open the Scanner. You can pinch the image to zoom in or out.
- Aim the scanner at the camera’s SSID and password. iOS will ask you to join the network; if you agree, your iDevice will switch to the camera’s network and connect automatically. Connection takes a few seconds; then your camera should appear in FieldMonitor’s Source list.
- If you see “Unable to join network”, check the SSID‘s spelling. Some Sony SSIDs use lowercase letters that FieldMonitor sees as uppercase; for example “DIRECT-DxU1” might be seen as “DIRECT-DXU1”. If this happens consistently, try resetting the SSID: Network > Wi-Fi > SSID/PW Reset. Repeat until the SSID is something that FieldMonitor sees correctly.
- If you see “Unable to connect”:
-
- Try again: connection doesn’t always work the first time. If you see “Unable to connect” repeatedly, go into Settings > Wi-Fi and choose the camera’s network manually; its password should already be known from the QR scan.
- If you repeatedly see “Unable to connect”, you may have a “profile” installed by the Sony app to join this network (Settings > General > Profiles). You can delete the profile and have FieldMonitor make the connection, or keep the profile and switch to the camera’s Wi-Fi manually. If you delete the profile and connect using FieldMonitor, iOS will remember the network the same way it does when using the profile.
To connect manually, on your iDevice, go to Settings > Wi-Fi and choose the camera's SSID (network name). The first time you connect, you'll need to enter the password shown on the camera’s password screen (your iDevice remembers that password for the next time you connect to the camera).
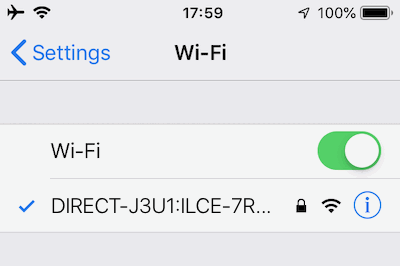
Once your iDevice connects, open FieldMonitor.
The network shown at the top of the screen should match the camera’s SSID or network name, and your camera should appear in the Source list. (Note: the camera may appear briefly, then disappear and reappear with a * at the end its name. Connection will only work when the camera’s name has the * on it.)
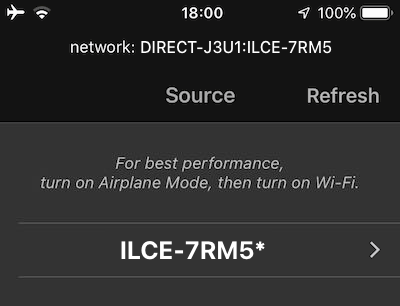
If the camera’s name isn’t shown in the list, tap Refresh. It should appear.
Tap the camera’s name to start monitoring it. If FieldMonitor then displays the message, “Press OK on the camera to allow FieldMonitor Pairing”, make sure you have Access Authentication turned off, and try again.
Wi-Fi-capable “PC Remote” cameras include the A7Riv.
A7Riv screens are shown. If your camera’s menus look more like Smartphone Connect or Smartphone Connection menus, there are similar processes, but the steps will vary depending on the your camera.
Do not select “Send to Smartphone” or “Send to Computer” in the camera’s menus. These functions are only used to transfer images; they do not allow remote control.
Press MENU and select the Network tab with “PC Remote Function” in it:

Select it, and go to page 2:

“Still Img. Save Dest” defaults to “PC Only”: the camera will not save stills on the camera but send them to the remote-control program. FieldMonitor does not save these stills, so change this to “Camera Only” so that photos taken by remote control will be saved on the camera (if you don’t change it, you won’t be able to take still pictures. If you change it to “PC+Camera”, stills will be saved on the camera and sent to FieldMonitor, but all that does is waste time, since FieldMonitor ignores the transmission). This setting only affects still pictures; video clips are always recorded on the camera.

Then return to page 1, and set “PC Remote Cnct Method”. If you set it to “Wi-Fi Direct”, you can then turn “PC Remote” on and connect to it directly, just as you would using Ctrl w/ Smartphone connections.

Instead, set it to “Wi-Fi Access Point” so that you can connect to it via a separate network:

If you haven’t connected the camera to your network before, you”ll see this screen:

You can use the WPS connection method if your access point supports it, or you can choose the access point directly:

When your access point appears, select it in the list:

If you need to enter a password, you’ll see this screen:

After you have entered the password, press OK to connect:

You can leave the IP Address Setting and Priority Connection settings alone and press OK:

When your camera connects successfully you’ll see this:

Press OK and you'll be warned that you’ll need to “Pair” FieldMonitor to the camera. You should only need to do this the first time you connect.

Then turn “PC Remote” On:

Select “Pairing”:

You will see a screen like this:

Connect your iDevice to the same network, and open FieldMonitor:

Tap on your camera’s name to select it. The Monitor screen opens, and you should see this message:

The camera’s display will change to show this screen:

Press OK, and the camera will “pair” to FieldMonitor. The camera will then send live-view images and give you remote control.
PC Remote stays On until you turn it off in the camera’s menu. The next time you want to connect to the camera, tapping the camera’s name should launch the Monitor window and immediately give you a live view and remote control. You don't need to pair again unless you switch to a different iDevice or reset the camera’s network settings.
Teradek H.264 transmitters
Set your Teradek to transmit RTP/RTSP, Quickview, Live:Air, Airmix, or TDS streams. RTP/RTSP and Quickview, when available, are the fastest to connect and the most energy-efficient. Quickview must be set to RTSP (not Airmix, when the option is available). If using HEVC encoding, RTP/RTSP streaming must be used. Authentication cannot be enabled when using FieldMonitor.
Direct or “Master” mode allows direct connection with no other hardware: you connect your iDevice to the Teradek’s Wi-Fi directly. See Teradek’s documentation for setting up “Master”, “Ad Hoc”, or “Access Point (AP)” mode.
“Client” or “Infrastructure” mode uses a separate Wi-Fi router or access point. Client mode often allows greater range because the router’s radios are more powerful, but you need to bring the router into the field and provide power. You can also operate multiple sources on the same network and switch between them without having to change the network on your iDevice. On your Teradek, select “Infrastructure” or “Client” mode, and connect to your Wi-Fi router. See your Teradek's documentation for details.
On your iDevice: Settings > Wi-Fi > [Choose the network]. The first time you do this, you may need to enter the password for the network. Then open FieldMonitor and tap the Teradek’s name to select it (if your Teradek doesn’t appear in FieldMonitor’s list, tap Refresh).
Hide or Show onscreen controls
Tap the screen to hide controls and data overlays; tap again to display them. To change what gets hidden, tap display controls  , tap Hide, then turn hiding on or off for controls, ’scopes, markers, etc.
Show and adjust ’scopes
Tap display controls  , tap Scope, then choose the ’scope(s) to be displayed. In any mode where ’scopes overlay the picture, simply drag them to new positions, and pinch them larger or smaller.
Show and adjust markers
Tap display controls  , tap Mark, then tap the marker type you want to adjust. Use the Show switch to turn it on or off. Use Show Color / Show Controls to toggle between display and color settings.
You can change the aspect ratio and safe area options available for Frame markers in the Settings menu.
Desqueeze anamorphic pictures
Tap display controls  , tap Image, then pick your lens desqueeze ratio. Tap
  /
/  to toggle between horizontal and vertical desqueeze. You can also side-crop the desqueezed image to selected aspect ratios (alternatively, you can turn on a frame marker for that ratio instead, and keep the entire image visible). Tap desqueeze adjustment
 ![]() or
or ![]() to fine-tune the squeeze ratio.
to fine-tune the squeeze ratio.
Flip the image for mirrored / self-shooting mode, low-mode Steadicam, or 3D rig monitoring
Tap display controls  , tap Image, then turn on Flip V and/or Flip H as needed.
Rotate the camera’s image for vertical video work
Tap display control  , tap Image, then tap
  to rotate the image to match your camera’s orientation.
Check focus
Tap display controls  , tap Image, then adjust Focus Assist Intensity to the desired level. Type controls the type of focus assist: ANALOG shows a standard peaking signal; EDGE shows a reduced-contrast picture with a bright edge-detection signal; DIGITAL shows a digital peaking display in red or cyan. (DIGITAL requires iOS 10 or later. Teradeks: Convert Images to RGB must be ON to use Focus Assist.)
Check exposure
Use the Y WFM to see where your levels are. You can use FieldMonitor to watch exposure as your camera moves through a scene, checking for overexposure.
If your iDevice supports false color, set the false color levels to show you over- and under-exposure warnings, and/or use the green level as your target exposure value.
Otherwise, you can use false-color LUTs with camera sources; just be aware that ’scopes measure the image with the LUT applied, and a false-color LUT will cause the ’scopes to show wildly inaccurate results. Turn the LUT on for false-color, turn it off to use ’scopes.
Note that ’scopes and false-color display for Panasonic sources may not be accurate unless FieldMonitor’s levels settings match the camera’s.
Check color
Use the RGB WFMs or the vectorscope to look at color.
When the camera is aimed at a white card, gray card, or grayscale, and is properly white-balanced, overlaid red, green, and blue waveforms will superimpose and turn white. On the vectorscope, the center dot will be properly centered in the crosshairs.
When the camera is aimed at a bluescreen or greenscreen, you can adjust exposure while looking at RGB WFMs or color histograms, checking for the best separation between your key color and the subject’s colors.
Electronically-generated colorbar vectors should fall in the vectorscope target boxes at either the 100% setting (typically EBU full-frame bars, or the fully saturated red/blue/cyan/yellow patches on ARIB bars) or at 75% (SMPTE and ARIB bars).
When shooting a DSC Labs chart with a “V/S Gain x 2” marking, or a Gamma & Density Log chart or Gamma-709 chart, use the 2x setting. In an ideal world, a perfectly set-up camera will put the chart’s vectors into the target boxes. (Unless you’re using a broadcast camera this probably won’t be the case; most cine cameras, camcorders, and DSLR-style cameras use different color and tonal-scale renderings, and the vectorscope pattern often will not match the layout of the target boxes precisely.)
Use LUTs
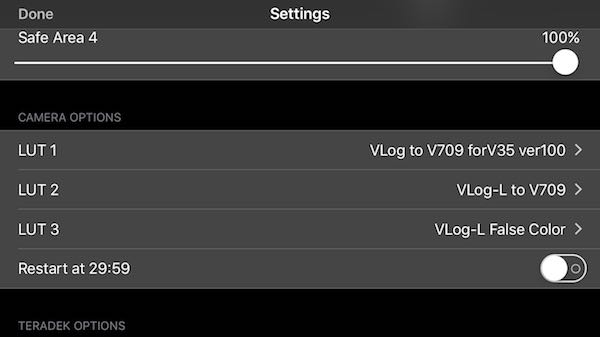
Select up to three LUTs in the Settings menu after you have imported them. Then, in the Monitor screen, tap the control button  , tap Level, and choose the LUT you want to use. (Teradeks: Convert Images to RGB must be ON to use LUTs).
Import LUTs
FieldMonitor can import 3D LUTs in .cube format using iOS file sharing, Finder (macOS 10.15 or later), or iTunes file sharing (Windows, macOS 10.14 or earlier). If you’re running FieldMonitor on a Mac, see below.
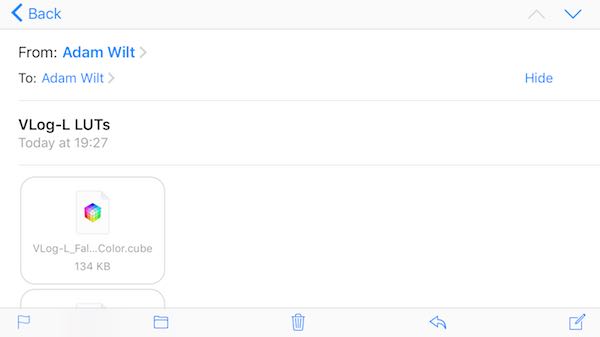
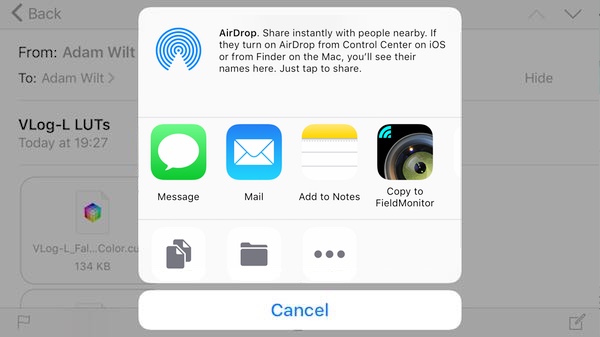
iOS file sharing: Email yourself a .cube file or put the file in iCloud Drive. On your iDevice, tap and hold it to reveal the iOS sharing sheet, and select “Copy to FieldMonitor” (or “Import with FieldMonitor” in iOS 10 or earlier). FieldMonitor will launch and import the LUT, after which it will be available in the Settings menu's LUT selections:
A .cube file in an email (the icon shown may vary). Tap and hold it to open the Share Sheet.
Find FieldMonitor in the Share Sheet. Tap it to import the LUT into FieldMonitor.
FieldMonitor launches, and imports the LUT.
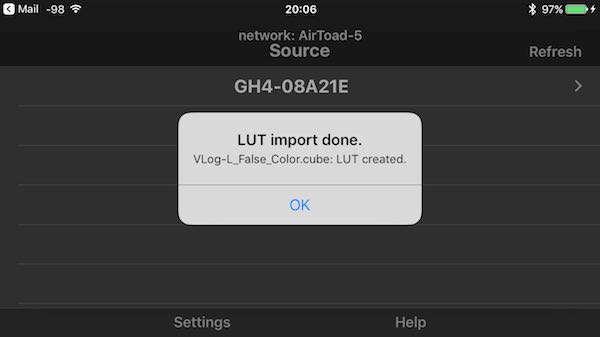
(If FieldMonitor is already running in the background but is not at the Source screen, you won’t see the “LUT Import done” message when FieldMonitor appears. Return to FieldMonitor’s Source screen, go back to Mail, and tap “Copy to FieldMonitor” again.)
Now you can assign the LUT to a one of three positions for immediate use.
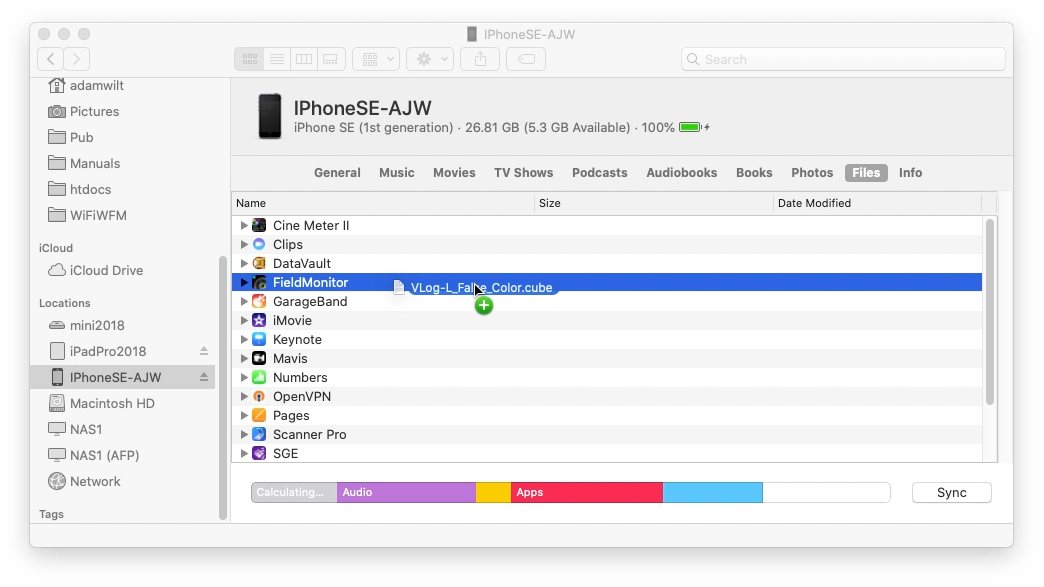
Finder: Connect your iDevice to your Mac and select it in Finder. Choose Files, then drag .cube LUT files onto FieldMonitor:
iTunes file sharing: Connect your iDevice to iTunes and view its settings. In iTunes 12 or later, select File Sharing in the sidebar, then select FieldMonitor in Apps. Drag .cube LUT files into FieldMonitor Documents:
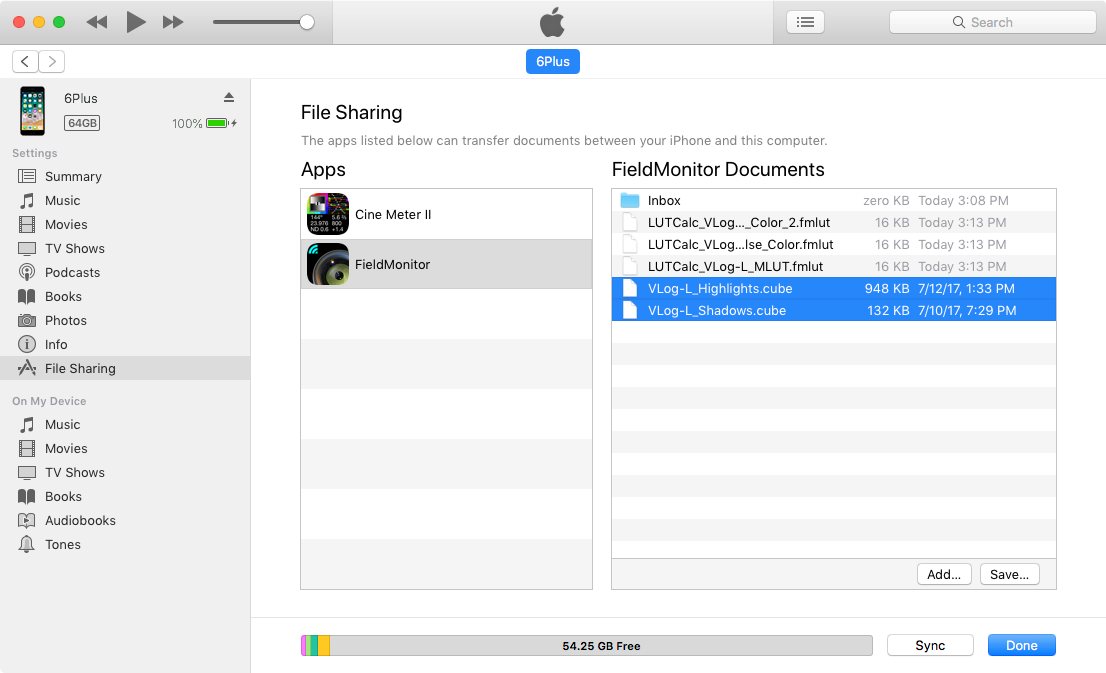
In iTunes 11 or earlier, select Apps in the sidebar, scroll down to File Sharing, and select FieldMonitor. Drag .cube LUT files into FieldMonitor Documents:
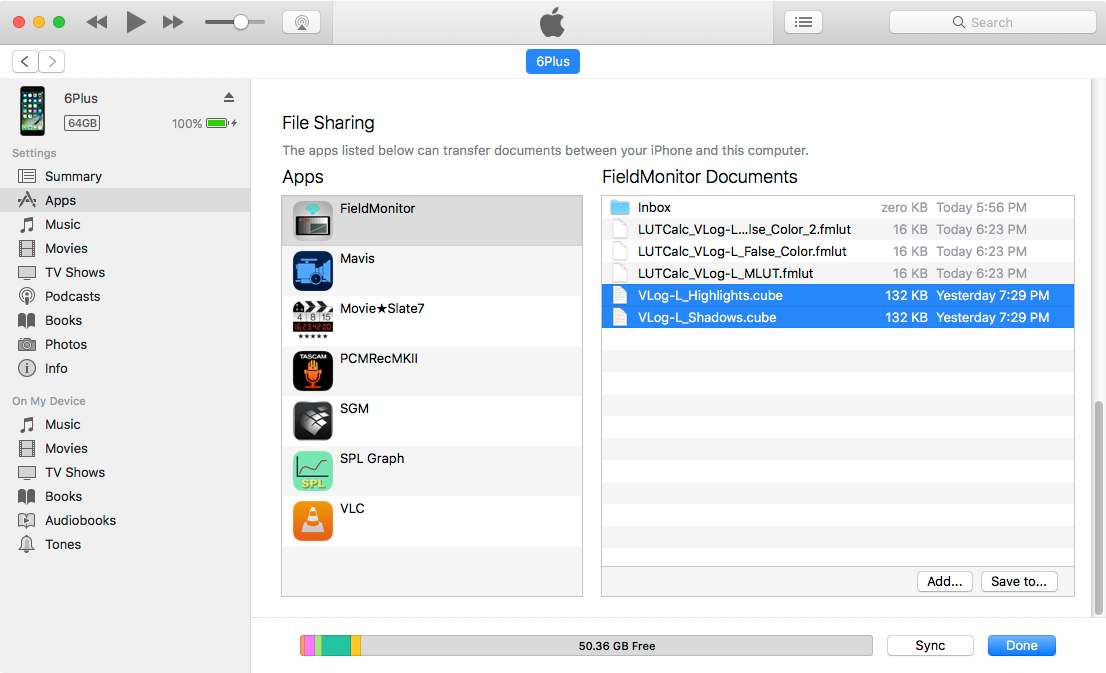
If FieldMonitor is running, tap Refresh on the Source Screen to read the .cube files and turn them into .fmlut files. Otherwise, FieldMonitor will read them the next time it is launched. This video shows the process with iTunes 12+:
.fmlut files are FieldMonitor LUTs. If you delete them while FieldMonitor is running, please tap Refresh on the Source Screen to let FieldMonitor know you’ve deleted them (otherwise, if you try to select one in the Levels controls, it will be displayed as NG — not good — and no LUT will be applied).
- Only 3D LUTs in DaVinci / Iridas .cube format are supported (they must contain a LUT_3D_SIZE line). All .cube files must have the “.cube” extension to be recognized by FieldMonitor. .cubes containing 1D LUTs cannot be used.
- .cube files must be in the size (or dimension) range of 2 to 64. 17-point and 33-point LUTs are fine; 65-point LUTs are too big.
- DOMAIN_MIN and DOMAIN_MAX values, if specified, are ignored. If these are not 0,0,0 and 1,1,1 respectively, the LUT will not be interpreted correctly and images will not render properly (DOMAIN_MIN and DOMAIN_MAX are optional keywords and don’t seem to be common; I haven't yet found a LUT that uses them).
- FieldMonitor uses the .cube’s filename for its description, replacing “_”s with “ ”s, so if your file is VLog_to_Rec709.cube it will show up as "VLog to Rec709”. If your file is called FLSCLRV3.cube, you might want to rename it more descriptively before importing it.
If you’re running FieldMonitor on a Mac:
- Quit FieldMonitor if it is running.
- Open the Library folder in your Home folder. If Library is not visible, press ⌥ and use the Go menu:
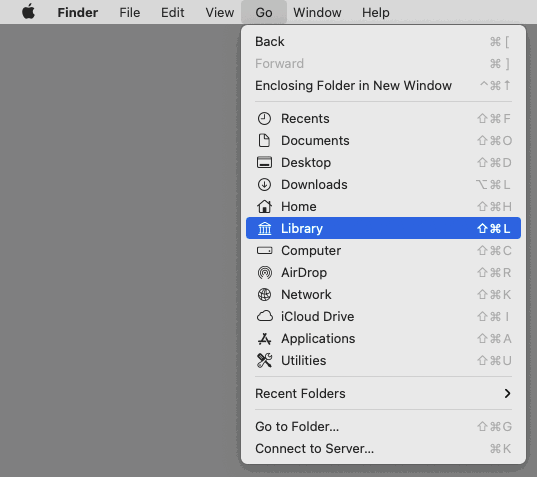
- Navigate to Containers/FieldMonitor/Data/Documents, and create an Inbox folder if it does not exist:

- Drag your .cube files into the Inbox folder, and restart FieldMonitor. FieldMonitor will load the .cubes and convert them to .fmlut files.
- Note: if you drag the LUTs into the Inbox while FieldMonitor is running, then hit Refresh on the Source screen, the LUTs will load but you won’t be able to close the alert or do anything else. Force-quit FieldMonitor and restart it to use the LUTs.
- You can also connect your iPhone or iPad to the Mac, open its Files panel, drag any .fmlut files from FieldMonitor’s iPhone/iPad files to the Mac’s Containers/FieldMonitor/Data/Documents folder, and restart FieldMonitor on Mac to use them directly.
Find LUTs
- I have “standard” Sony LUTs (LC709, LC709A, and Cine+709) built for FieldMonitor.
- IWLTBAP has lots of free and low-cost LUTs, including false-color LUTs for Rec.709 and V-Log L (useful if your iDevice doesn't support FieldMonitor’s false-color overlay), various log-to-Rec.709 LUTs, and even a LUT generator.
- You can build your own LUTs, including false-color and other custom LUTs, using LUTCalc.
-
- Build a 3D LUT. Size should be 33x33x33. Choose Grading LUT, and set LUT Type to General cube LUT (.cube).
- Input Range and Output Range must be 109%. Many output gammas default to 100% and you will need to correct that before generating the LUT, otherwise your images will be too contrasty and the levels won't match those shown in LUTCalc.
- You can create looks in, and export LUTs from, DaVinci Resolve.
- That’s just the start; your search engine is your friend...
Launch FieldMonitor from another app
In Apple’s Shortcuts, simply select Create Shortcut, Add Action, Apps, Open App, and choose FieldMonitor. To open FieldMonitor from an app like Launch Center Pro, use the URL scheme “fieldmonitor://”.
Get Help or report a problem
Please check the main support page or the FAQ in case I’ve answered your question there. If that doesn’t solve your problem, please contact me. I’ll answer as soon as I can and do my best to help you out! (If your email isn’t answered within a day or two, it may have fallen into a spam-trap; please try again a day or two later.)